Lucy's Tissue.
Hello and welcome to Magpieheaven Followers and Friends. Today I've been having so much fun in between tutoring my students that I had to share it with you! Over on the PaperArtsy blog this week there have been some incredibly inspirational GDs! First there was the wonderful, Liesbeth with her sewing tin. I was tempted to join in with this, as it involved burning. I would love to have created a tin in which I could see pictures of bearded old men and collie dogs with revolvers - or was it meerkats(?) - like Helen's. Alas we don't have a coal fire except at Christmas! Then there was Sara Nauman with her beautiful tissue covered journal! Oh dear, I'm already behind with the journals I'm supposed to be working on! In the end it was Lucy who lured me away from the housework and tutorial preparation, I just had to try her suggestion for stenciling with Grunge Paste onto tissue. I loved her beautiful little house with its Clarice Cliff colours and bright as a button roof, but I had nothing like it. Never mind, there was a tiny papier mache chest I had been meaning to alter for ages. I was put off because it is so tiny I couldn't imagine how I might add texture and dimension to it. I wondered if the technique Lucy had made work for her house might be adaptable to a curved lid.
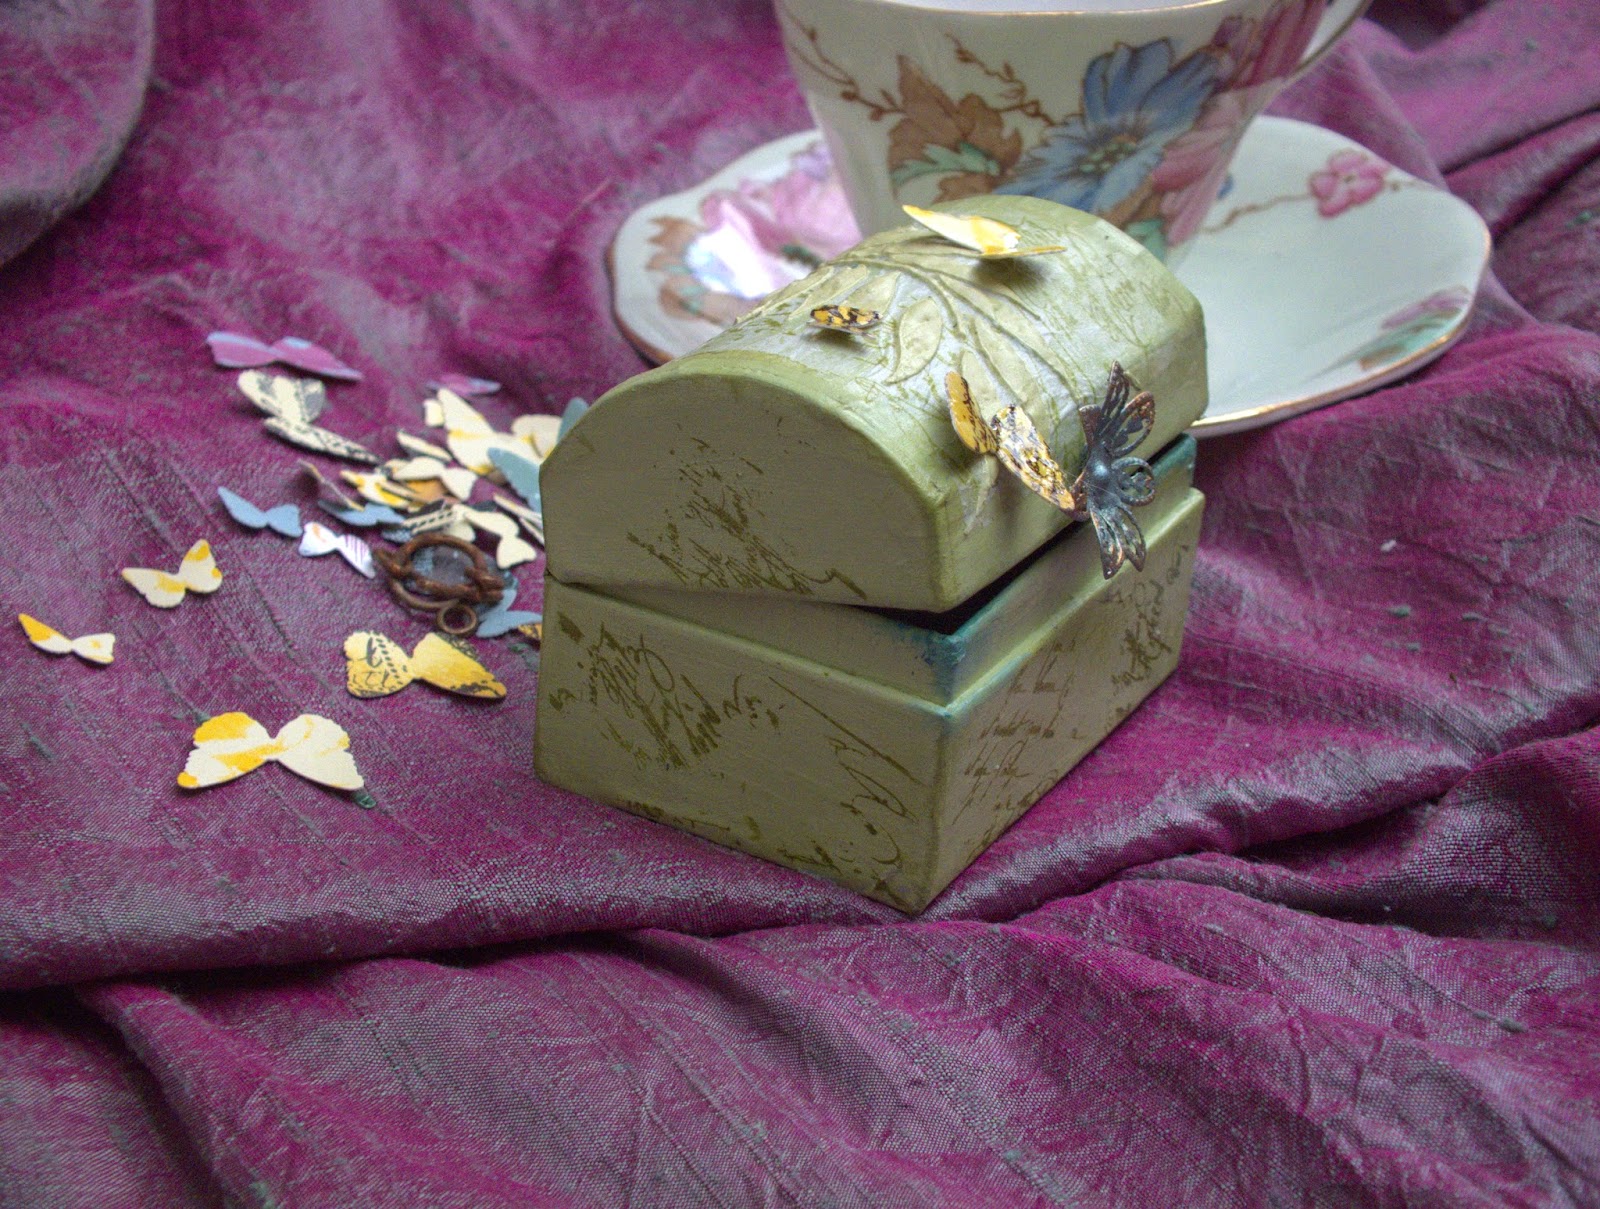
I began by painting my tiny chest on the inside with Little Black Dress Fresco to contrast with the outside of my box. I also painted some card with different Fresco paints and stencils, stamping some with the Ink and the Dog Mini 30 before using the Martha Stewart Butterfly Punch to turn them into spring butterflies. I then covered them with Versamark and dipped them into clear UTEE, heating them from below with a heat tool. I took great care holding the tiny butterflies with craft tweezers!

It's difficult to photograph, but the effect was to create what looked like tiny porcelain butterflies. After they were finished, I applied first two coats of Sage and then two coats of Guacamole to the tiny box, just touching the edges with Hey Pesto. The next step was to try Lucy's tissue technique! For this I used ordinary tissue wrap in white, stamping it first with Ink and the Dog Mini 84 in Wendy Vecchi Fern Green Archival ink. I won't explain exactly how Lucy's technique works. Just click here to find out. I used Satin Glaze to adhere my tissue to the lid and smoothed it down carefully over the curve. I used some Grunge Paste coloured with Hey Pesto and this is the effect!
I was so pleased because the tissue really does disappear! This is such a tiny box, I kept it simple using the Lin Brown leafy Eclectica stencil.
Here's another view of the lid! It really is so simple to do and it works a treat!
Just to show the scale, I have photographed the box next to my Grandma's afternoon tea cup! The finishing touch is a little metal flower, painted with Bora Bora Fresco with a pearl at the centre, given the Treasure Gold treatment with Sapphire, Green Amber and Florentine.
I stamped the Ink and Dog Mini 84 straight on to the sides of the box. I would love to have included a sentiment like the beautiful William Blake one chosen by Lucy; but the box was so small I felt it was best to keep things simple.
And inside you will find a tiny blue bird's egg that I came across lying on the path on one of my country walks with Mr Magpie. I do hope that the bird to which it was once home is now flying as free as those butterflies on the lid! Thank you so much for stopping by to look today and Thank You, Lucy for a brilliant new way to use tissue! I shall definitely be re-visiting this one!


Great take on the house, love your box and of course the colour is just fantastic, love all those butterflies just spread all over too, lovely touch
ReplyDeleteSam xxx
oh wow, that's just beautiful!!
ReplyDeleteoh that's beautiful Julie ann...and speedy lol xxx
ReplyDeleteIt is lovely Julie Ann, I love the colour & the butterflies & the flower looks great.
ReplyDeleteBeautiful,love it....may have to try that method myself it's looks perfect!
ReplyDeleteDonna.x
It's an an amazing box , Julie Ann Lee. Gorgeous details and finish!
ReplyDeleteOooh Julie Ann that is exquisite! The leaf is so raised and textural! You have made such a great choice to use this technique on a curved surface. It would have been so difficult to stencil otherwise. I am so thrilled you found it useful. Thank you so much for playing along!!
ReplyDeleteLucy x
This looks stunning Julie Ann...I also love the stenciling over the lid - a really nice touch.
ReplyDeleteDot x
A fabulous altered box, great texture.
ReplyDeleteBeautiful ickle box Julie Ann, beautiful muted colours and then the pops of colour from the butterflies. Lovely interpretation of Lucy's project :-) xxx
ReplyDeleteBeautifully altered, I love the tiny butterflies Julie Ann xxx
ReplyDeleteWhat an adorable box! and I love that you have the egg in there! Our momma Robin hatched 2 babies today- this made me instantly think of them! Perhaps I will gather the shells when they leave the nest! And someday I would love to sit with you for tea and create and chat away! xoxo
ReplyDeleteThis is really beautiful, curved surface appealed to me too. Nearly finished mine. Love the birds egg and your reaction to it. Xx
ReplyDeleteSo.so beautiful Julie. I love working with tiissue, i add it to lots of projects. I adore how that leaf curls over the top. As for quotes why dont you print some mini index cards with quotes and pop them inside.
ReplyDeleteBeautiful box Julie, it's a great technic which I have to try xx
ReplyDeleteWhat a gorgeous response to Lucy's fabulous inspiration - beautiful work as always, Julie Ann!
ReplyDeleteAlison xx
A great box JulieAnn. Looks really effective, lovely colour choices xx
ReplyDeleteThis is just such a sweet little box, it looks absolutely gorgeous and I adore the colours you have used! Also love the little porcelain look butterflies, they adorn it to perfection!!
ReplyDeleteThank you by the way for your very sweet comment on my blog! Have a happy creative Sunday!
Beautiful box! Lovely butterflies and colours. I'm thinking of inside egg xx
ReplyDeleteGORGEOUS!
ReplyDeleteCan't believe how tiny this box really is! Must have been so fiddly to glue the tissue. Lovely effect in the end and the butterflies are perfect!
ReplyDeleteStunning really love this little box. :)
ReplyDeletelooks amazing, the colours you've used are stunning xx
ReplyDeleteWhat a beautiful and delicate box Julie Ann. I can really see that porcelain look in this. Jenny x
ReplyDeleteWow wow wow truly gorgeous little box. I love the green colours, especially next to the blue of the egg inside. I really must have a go at this technique, Lucy's make was absolutely amazing and you have certainly done the technique justice. Hope your well, I'm fine. Tutorials are those for us or your students? Lol. Can't wait to see the journals and forget the house work, if it's like our house it will still be there the next day lol :-) hugs Kezzy xxxxx
ReplyDeleteSome people are too dog gone good and you sweet lady are one of them. Beautiful little box!!
ReplyDeleteSandy xx