Friday 28 February 2014

Textures and Stencils!

Hello there and welcome to Magpieheaven! Blogland seems to be alive with beautiful texture! I've been visiting some wonderful blogs and admiring some fantastic works of art that you can't help but want to reach out and touch. At Frilly and Funkie there's a great challenge to create using stencils and texture. I needed to make a special card for someone whose identity I won't reveal as she might read this blog, but I know she loves texture and stencils. Her birthday isn't so very far away, so I decided to create something for this challenge and especially for her. I should like to enter this textured and stenciled card for the Frilly and Funkie Challenge.

I started with this scrap of yellow gold material patterned with delicate roses. How did I get from that to this?
 I ironed my fabric and then cut out a tag from it and a piece of card using my Tim Holtz tag die-cut. I stamped my fabric tag with the Lynne Perrella stamp I simply can't stop using at the moment! On her blog, Lynne talks about finding the inspiration for these vintage images in the outdoor postcard market in Paris! What a wonderful place that must be filled with a lifetime's material for art and stories! I inked with Versafine Onyx black and then, with a piece of grease-proof over the top, I pressed my tag again to heat set it and then fixed it to the card tag with PaperArtsy Satin Glaze. I'm really sorry, but this was one of those occasions when I got so carried away everything but the project was forgotten and when I looked at the time - well, I needed to cook supper, my project was in the last stages and I hadn't taken a single photo! I hope that detail pics and my memory of what I did step by step will suffice!
I wanted to use strong and contrasting colours on my tag and to create both an impression of texture in the painting, and to capitalise on the texture of my fabric. I mixed PaperArtsy Fresco paints in Bora Bora, Inky Pool, South Pacific, Hey Pesto, Nougat, London Bus and Autumn Fire and some of the lovely Limited Edition Lin Brown Chartreuse with blobs of Liquitex Fabric Medium. This stuff was brilliant, as it made applying the paint to the fabric so much easier without thinning it and taking away its vibrancy. I shaded and built up the faces especially, with different applications of colour, a little as I might do with oil painting and I allowed some of the yellow fabric to show through to give the impression of lamp-light. I used a fine paintbrush to highlight the hearts and to go over detail. When I was satisfied with the painty effects on my fabric tag, I applied a coat of Satin Glaze, allowed this to dry and then applied another. I think I applied four coats in all. I was delighted with the effect. My fabric had become like canvas and those Fresco colours really glimmered.
Here, I hope, you can see the effect of the fabric showing through the translucence of the paints. I hope it gives the impression of faces glowing in the lamplight as they write their journals, love-letters or memoirs! You will see too that I added a sprinkling of Shabby Blue Frantage to create a different kind of texture. I hope you can see how the Liquitex makes blending paints on the fabric so much easier.
 Now for the background, which I worked on while my tag dried. To create texture here, I used the technique I've seen demonstrated by the wonderful Darcy Wilkinson of Art and Sole, applying layers of paint, stenciling and stamping and then wiping away and sanding to reveal the layers beneath. I also brayered with Nougat and used found objects to create circles. The script you can see here is a PaperArtsy mini 26 stamped first in white and then over the top in blue and the stencil is a Prima one of flourishes, which I love at the moment. When I was satisfied with my background I finished off by stenciling over it with Wendy Vecchi gold Embossing Paste flourishes. I made the button from Shrink Plastic, using the buttoned boot from Lynne Perrella's new stamps. I created a Mother of Pearl effect by clear embossing my button  which is a PaperArtsy die-cut flower, with UTEE, and then rubbing a little Aquamarine Treasure Gold over the edges when it was cooled down. I punched two holes in the centre with a Crop-o-dile to make it a proper button and then threaded through a scrap of embroidery silk and tied in a bow.
I added further texture to ribbons and flowers by painting this Peterloo flower with Bora Bora and giving it a Treasure Gold centre. The seam binding is dyed with some Tim Holtz Distress Inks in Peacock Feathers and Broken China. I used narrow strips of blue ribbon as trim, dyeing them with Distress Inks and then melting Shabby Blue Frantage over them to add texture.

The sentiment, which is from Lin Brown's lovely flower sentiment collection was stamped onto some of the fabric and then stacked onto little squares of card edged with UTEE, slightly melted so that it kept its granular texture. I painted a resin flower arrangement with Mermaid and then highlighted it with Treasure Gold in Aquamarine and Green Amber. I thought my tag might appear a little 'lost' against the blue background of the card, so I painted a rectangle of card with Little Black Dress and stenciled flourishes on it in Antarctic.
Thank you so much for looking at my play with textures. I've so enjoyed creating these effects and exploring yet another way of using this highly adaptable Lynne Perrella collection. Wherever you are and whatever you're doing have a happy and creative time. 

Wednesday 26 February 2014

Dragon's Dream TIO

Hello and welcome to Magpieheaven, where it's the time to dream with the Dragons again! What amazing tags you created last time - so many glorious images of birds! You'll see I still feature a little bird of freedom on this week's tag! This time the very talented Elizabeth has set us a great challenge! It's always fun to make a tag, but to create one that is not the usual tag shape - well, that's bound to stimulate some imaginative responses! If you pop over to The Dragons Dream here, you'll see some of the ingenious ideas the Design Team have come up with. As usual you need to have at least one stamped image on your tag and you must feature the letter of this fortnight's challenge, which is 'A', otherwise you're free to flap your wings and take off on a flight of fancy with any shape you can find that works as a tag!
One of my favourite dies is this one of a window. As well as liking the shape, I've always found it intriguing and been drawn to lighted windows: what secrets do they hold? OK, I know, I'm just nosy! The new Lynne Perrella Collection from PaperArtsy features this beautiful, large stamp, which is in the form of a sheet of postage stamps. These looked as if they would fit into my little window panes so I decided that I would use them and another part of the sheet to back my tag so that it looks nice on both sides. They also suggest the window that artists invite us to peep into on a wonderful world of colour and imagination! I stamped the word 'Artist' from one of Sara Nauman's Eclectica plates for PaperArtsy.
Here is the reverse side of my window shaped tag. I added a podium die to the top of the window to add interest to the shape. I have often thought how the postage stamps we take for granted and pop on to our letters are mini masterpieces. Wouldn't it be sad if email, Twitter and Facebook meant that we no longer needed to use them? The artists who create our postage stamps bring miniature window panes of art to us in our everyday lives. That, of course, got me thinking about everything that word means to me. I believe it's the greatest compliment you can pay a creative person to call them an artist. Since I began blogging in April I have met artists second to none who have filled my life with colour and great pleasure! And, of course, Lynne Perrella is one of my favourite artists too! 
s
I don't often use large areas of black, but this time I created a shabby look for my window by painting it first with PaperArtsy Beach Hut, which is a very vivid blue then a coat of Crackle Glaze and then a thick application of Little Black Dress. In this close-up you can see I played with some Frantage too - Shabby Blue and some Gold UTEE. I had some black lace and black mesh in my stash and some gold trim that is so fine it reminds me of spiders' webs. The 'A' is from Tim Holtz's Worn Alphabet. Some dyed seam-binding, coloured with Peacock Feathers and Broken China Distress inks and a Prima Mechanical finish off the top.
For behind my window panes, I used some Smoothy Card with Fresco Opaques blended: Mermaid, Lake Wanaka and Stone. I then stenciled over this with South Pacific translucent to hint at sunlight and shadow sending leafy patterns over the panes...
 and added a little script in places. I stamped my Lynne Perrella sheet of postage stamps in Versafine Vintage Sepia for a change. I chose the images I liked the best and coordinated the three ladies by giving them a vivid splash of London Bus Fresco for their lips. I painted some book text and used a lace punch by Xcut on it to edge my tag. The Prima wooden bird stamped and painted and then glossed with clear UTEE symbolises how the artists around us help us to 'Take Flight' and soar on the wings of imagination.
 Thank you so much for dropping by today. Please do join in with this fortnight's challenge and link up here. I'd love to see what new tag shapes you can come up with!

Tuesday 25 February 2014

Something Old, Something New!

Welcome to Magpieheaven. I love having new crafty things to play with and I'm still experimenting with the new Lynne Perrella stamps from PaperArtsy. I wanted to see how they would work with Lin Brown's exciting new Limited Edition Paints so I started to play with some Tikka Fresco Finish and I was struck by how like a ceramic glaze it looks. Now, what would happen if it was put together with some of my old favourites, Fresco Finish blues like Antarctic and Inky Pool? Could I also incorporate my favourite Shrink Plastic painted with Fresco and stamped?
 I decided that, together with some Grunge Paste, the combination could suggest the beautiful ceramics of Luca Della Robbia, the fifteenth century Florentine ceramic artist. You can see some of his beautiful Madonnas here. Although I can't be in Florence right now, I thought, maybe I could hop on a train to South Kensington and admire the Della Robbias in the V&A, or better still, try to evoke Florence with a little hanging, some paints, those lovely new stamp images shrunk down to miniature, embellies and Grunge Paste. My  hanging is nothing like as beautiful as Della Robbia, of course, but I did enjoy bringing together the old and the new in creating it.

 I started with one of these little hanging boards from PaperArtsy, giving it several coats of Nougat Fresco to begin with, then applying Gesso to the string, sprinkling with Aged Copper Frantage and heating up.
Now it was time to add some depth. I love the movement, the wonderful swirling draperies of Della Robbia as well as the gorgeous colour and texture of the ceramics. I had a little Melissa Frances resin Putto from the Funkie Junkie boutique and some pretty corners also from FJ. I fixed these to my hanging along with some jump rings and a Prima Mechanical because I liked the idea of raised circles. When these were all in place, I mixed up some Grunge Paste with a drop of Tikka. I applied it to the edge of my hanging rather like rough icing a cake; used a fine paint-brush to create a tree trunk and branch design down one side with it and then squeezed it through a stencil of flourishes by Prima. After all this was dry and firmly fixed, I got out my misters and sprayed with watered down Antarctic and Tikka Frescos. As you can see in the bottom of my photo I also sanded a piece of Shrink Plastic and painted it with a very thin coat of Nougat. What you can't see in the photo is the sheet of Shrink Plastic I started with, which was an Antarctic blue.
Sorry, but I then became carried away with what I was doing! I'll try to remember! Deep breath...I sprayed then with some Inky Pool and some more Tikka. I then painted over my Putto with Nougat and just a little Tikka to age him. I accented his curls with Florentine Treasure Gold and the robes and foliage around him with some Green Amber Treasure Gold. You can see that I added a Prima wooden butterfly painted with Mermaid Fresco and then sprinkled with clear, gold and Shabby Blue UTEE. I added a little metal leaf and then - the Shrink Plastic Lynne Perrella images! I stamped these onto the painted Shrink Plastic with Onyx Black Versafine because the Fresco Paint, as long as you don't apply it too thickly, allows you to stamp with any ink and get really good results.
  However, my play with Shrink Plastic resulted this time in one of those 'happy accidents' people take about. First I stamped my images from LPC030 onto SP painted with Antarctic, die-cut and then coated in clear UTEE. I really didn't like the result. It just didn't go with the rest of the hanging because the images somehow look too glossy against the chalky, painty background, but I recklessly stuck the images down! I decided to make some more; stamped onto SP coloured with Nougat this time and dispensed with the UTEE: would it work if I stuck them on top? To my relief, I think it did! The new images placed on the old ones were raised up and they no longer looked insignificant on the hanging as they had before. I think they became much more focal because of this.
I accented with Florentine Treasure Gold, pearls and gems and I stamped with a PaperArtsy Mini26, one of my 'all time' favourites to suggest ancient script.
Some coloured seam-binding and a hint of Wendy Vecchi Cornflower Blue Archival script from LPC28 complete my tiny hanging. Thank you so much for visiting today.
 I should like to enter my plaque for Fashionable Stamping Challenges, Anything Goes here and 
Country View Crafts Challenge Painty Pleasures here.

Friday 21 February 2014

Painty Pleasures.

Hello and welcome to Magpieheaven. Please let me apologize in advance for lots and lots of pictures today! I got so carried away with using lots of PaperArtsy Frescos and my new Lynne Perrella stamps! Over at Country View Crafts this month the challenge is 'Painty Pleasures' so I decided to join in and to enter a card and matching envelope for my old friend, Alison's birthday. It was a gift I created for Alison that set me blogging in the first place back in April last year and I always enjoy creating things for her. A beautiful envelope painted by Darcy Wilkinson of Art and Sole when she was demo-ing at Stevenage recently inspired me to extend the pleasures of paint from the card inside to the envelope - something I have none done before!


 I wanted to create a world of paint for Lynne Perrella's intriguing ladies to inhabit. I had already done some samples using the stamps, but with this project I wanted to give my imagination even more freedom and to use more vivid colours than I do usually. At the same time I wanted to bring in the natural world, as Alison loves Natural History, especially moths and butterflies. There is something so ethereal about these creatures with their gauzy wings that complements Lynne's intriguing images.
I knew I wanted a space to write Alison's name at the centre of the envelope and, although I would not be sending the card but giving it by hand, I wanted to have a place left for a stamp. I masked off these sections on the large envelope and then set about creating a dream landscape for a Lynne Perrella lady.
I did this by building up layers of Fresco paints, stenciling and stamping as Darcy had demonstrated. I used opaques to start with then layers of translucents. I chose colours like Antarctic, Mermaid, Spanish Mulberry and Hey Pesto, then South Pacific, Inky Pool and some brayering with Snowflake. I had been really impressed with the effects Darcy achieved by using bottle lids to draw around so I tried out this technique too. Here is the envelope as it looked after I had applied my layers and then wiped them away in places using a baby wipe and  drying off and sanding down.
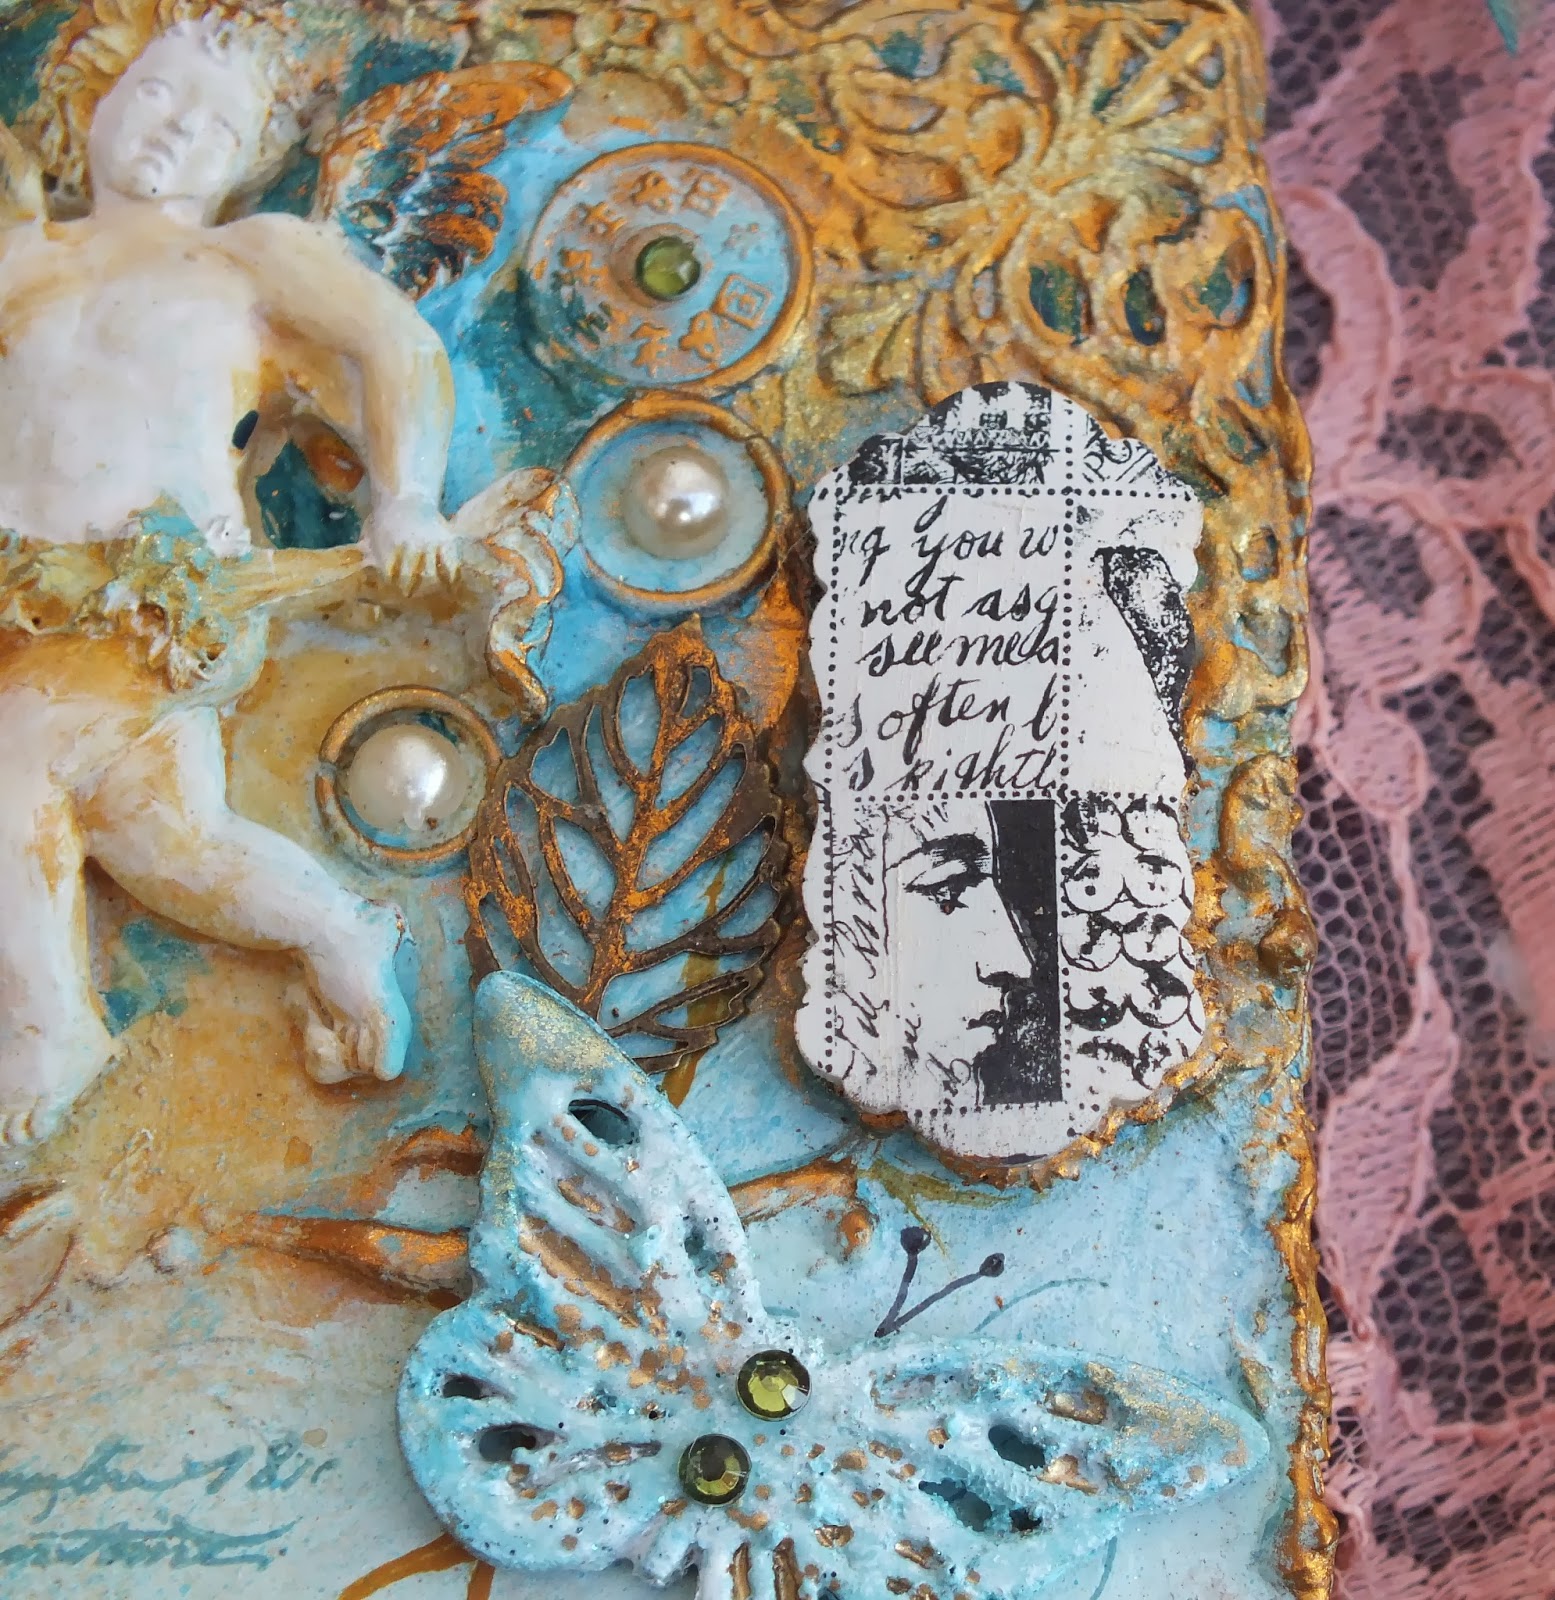
I stamped feathers using Snowflake Fresco and stamped a Lynne Perrella image onto tissue, colouring it with Frescos: Chartreuse, one of the new Lin Brown translucents and South Pacific. I drew around the label to give a fake tattered effect and embossed Alison's initials on it. The little moth from PaperArtsy Urban Snapshots was stamped on card painted with Mermaid Fresco, clear embossed and then fussy cut.
These colours evoked twilight to me, when beautiful moths flutter towards the lamps in these fairy tale houses...
I also wanted to decorate the flap so that opening the card would be a painty pleasure too!
For this I used the lovely new Lin Brown leaf stencils. Then it was time to start on the card.
I used the same effect with layers of paint, but I kept an area in the middle of the card pale for my stamped image. I used Nougat, Stone and Honeydew Frescos on this area.

This became this...
I coloured some Grunge Paste with Mermaid and used this through a stencil around the edge. I added some Treasure Gold. I also used some Wendy Vecchi Embossing Paste in gold, which is so effective when it dries.
Using a fine brush, Frescos and Satin Glaze, I coloured the detail on the image, highlighting with tiny gems and a Prima Embellishment.
These Lin Brown sentiments are just lovely and this one really sums up my friendship with Alison. We have known each other since we were eighteen and usually when we meet up we share the things we love: we visit gardens, art galleries and museums and I always feel that she has added a little extra colour to my life. I hope my card will bring a splash of colour to Alison's birthday.
If you have stayed with this post, thank you so much for looking so patiently at so many pictures! I really gained so much 'painty pleasure' from creating it. Have a lovely weekend wherever you are and whatever you are doing. I do hope the sun will shine for you and colour your life with lots of fun and joy.

Wednesday 19 February 2014

WOYWW! It's great to be back!

Hello, welcome and thank you for dropping by to look at what's on my workbench this Wednesday! It's especially nice of you to remember me as I've not been around much lately! If you're wondering what I'm chattering on about in my magpie way, do drop over to the lovely Julia's Stamping Ground here, read her lively take on the world of crafting and take the opportunity to show what you've been creating and peek at other crafters' work desks all over the world. Here, after all this time is what's on my work desk, which is still, as it always was, the top of my washing-machine!
That hasn't changed; but life has - in all sorts of unexpected ways! I have joined some design teams, which is keeping me busy, but happy! I was ill with an infected salivary gland, which was surprisingly painful, but that's better now - thanks to anti-biotics! Helping my Mum settle into her new home nearby has - unsurprisingly - been lots of work; but the flat now looks beautiful. She's eighty-four and partially sighted so adjusting has been hard, but she's happy now. Some of you may recall that my son, in his early twenties, suffered a mental breakdown at the start of an MA course and was diagnosed with Aspergers last April. I am so proud of him because he found himself a voluntary job, worked hard and has overcome huge challenges so that the team he works with are now applying for funding to keep him on as a paid employee! And, from stepping into a world that I didn't know existed before last April, that of Crafty Blogland, I have found new friends! The Sunday before last the amazingly creative Alison Hall of Craftytrog's Inky Adventures kindly took me to Stamperama, Stevenage where I met up with all kinds of lovely people: Helen Lindfield, Lin Shields, Deborah Wainwright, Kirsten Sheridan, Sarah Baldwin, Hazel Agnew, Alison Bomber and - of course - Leandra Franich and Darcy Wilkinson. There are other really dear friends who were not able to be there like the lovely Lucy Edmondson who I hope to meet up with soon and the incredibly talented Laura Bomber. Maybe some day I shall meet in person with my friends, Kerry Ann and Dianne who have both filled my life with colour, kindness and inspiration. The kitchen re-furb that I thought was underway when I started WOYWW is no nearer completion and now helping with flood damage is increasing Kevin's workload even more, but we can live with our shabby and far from chic kitchen a bit longer - far worse to have lost your home to filthy waters: my heart goes out to all the victims of the terrible storms.
I mustn't ramble too much, but can you spy what's on my desk today? I have discovered the delights of brayering; using baby wipes for everything including wiping away layers on projects; some homemade stamp cleaner which I learned about through WOYWW and the tiny edge of something secret I'm working on. Well, I have to fly now, but have a wonderful, creative Wednesday. I'll try to visit as many of your desks as I can and leave my number! Happy WOYWW!

Friday 14 February 2014

The Magic of Lynne Perrella

Hello and welcome to Magpieheaven! As you probably know, I am crazy about PaperArtsy stamps! Not long after I purchased my first 'Ink and the Dog' stamp, I discovered that PA also featured stamps by an artist from the US called Lynne Perrella. Looking at her stamps was to enter the world of my dreams. I just had to have these images to use in my work! When I received my first plate I was so excited! These images were incredibly and meticulously detailed and, with Versafine ink, they stamped out like a dream: crisp and clear every time. I was so excited when Leandra broke the news that Lynne had a new collection ready and they were GORGEOUS! She is right. These stamps are so imaginative, so detailed and so adaptable. I have used them for three quick and easy projects in this post, but I can already see the possibilities for using them with fabric, on altered items of all kinds and journaling! They will be available in your local craft shops from February 19th so please do check them out. Also if you go over to the PaperArtsy blog here you can find out more and see some other fabulous samples from PaperArtsy guest designers!

I loved this plate because it reminded me of a book I read back in the 1980s called 'The Madwoman in the Attic' all about women writers. My first project, a little birdhouse, portrays what writing meant for so many women; escape from their cages - on the wings of imagination! And once you've flown in your imagination that is just the beginning of the quest!

I took a little wooden birdhouse and painted it with Snowflake, as I wanted my colours to be really bright for this project. I also used a little Nougat Fresco and you might be able to see this peeping through in places.
I then sponged on coats of Mermaid Fresco with Inky Pool around the edge and stenciled with Inky Pool and a Prima stencil of flourishes to give a lacy, vintage look. I removed the string that came with the birdhouse because I decided it would be easier to paint this way and then I had the idea to change the fastening to a seam binding one in coordinating colours.
I wanted a really strong colour contrast, so I painted some Smoothy Heavy Card with blended Yellow Submarine, Tango and Autumn Fire Frescos, knocking back with some Nougat Fresco in the centre of my card. If you haven't used PaperArtsy Smoothy Card for stamping, I would strongly encourage you to give it a go. With Versafine ink it is the perfect surface for stamping, especially with stamps as detailed as Lynne Perrella ones. I cut out my lady using a PaperArtsy Eclectica die designed by Lin Brown and made a flower for the roof, using another PA die and this stamp
which is so adaptable that I used it on my other projects too and I see myself returning to it again and again. I also coloured and Treasure Golded a resin flower arrangement to add and used some of that big stamp on a punched out lace edging.
The little bird is a painted and stamped Prima wooden bird and the heart is Crackle glazed and edged with Gold UTEE and a few dabs of Hey Pesto translucent Fresco paint.
I used images from these plates on two other projects
I used clear UTEE to seal and coat my lady and I used the postage stamps with a masking technique and Wendy Vecchi Cornflower Blue Archival Ink to add to the background.
This very spirited looking lady found her way onto the centre of a tag. I used a Sara Nauman Eclectica word and cut out one of the pens stamped onto Smoothy, fussy-cut and embossed with gold and clear UTEE,
I was so inspired by Darcy demoing background techniques at Stevenage at the weekend, that I took a leaf out of her book and played with brayering, drawing around different sized lids with Portfolios, stenciling and stamping and then knocking back and sanding for my background both with this tag and the little hanging I did.
I also used the script from this plate - the images here are so wonderful I haven't touched the surface of what could be done with it yet! Can you tell I'm really very taken with Lynne Perrella's work?

Here is my hanging board, which I edged with some Grunge Paste accented with Treasure Gold - again a tip from Darcy! The clear 'wordy' nugget is an idea I love from Alison Bomber's 'Words and Pictures' blog.
I am sorry for so many pictures on this post but I just got completely carried away by these lovely new images!
Thank you so much for stopping by Magpieheaven today. I've had so much fun sharing these stamps with you. Have a great week and keep safe in the gales, storms, snow and floods or whatever extreme weather is hitting wherever you are! Love from the Magpie's Nest x.

Wednesday 12 February 2014

A Dragon Glow!

Hello and Welcome, friends and followers! This week at The Dragons' Dream, the very creative Gabrielle has chosen the recipe of the letter 'G' and 'Birds'. Please click here and take a look at her tag - I love those quirky little birds, and the other tags created by the Design Team are miniature masterpieces every one! My tag was inspired by a wonderful wildlife photography exhibition at London's Natural History Museum. I spent a very enjoyable morning there with an old friend last week. The photos were vibrant, portraying the birds and animals as part of their beautiful habitats. There is a note of sadness about the exhibition, though: many of the creatures in the photos are endangered and so many unique and lovely parts of our world are being destroyed through thoughtlessness and greed. I wanted to create a tag that would celebrate this incredible planet we live on and remind me not to take for granted all the beauty around me.


I used a combination of three or four different stamp plates for my tag, so the Magpie's Nest was in a muddle for a while! I did enjoy mixing and matching stamps.
One of the most glorious spectacles the world has to offer is a sunset. For this tag, I decided to step outside my comfort zone and use some colours that I have not really played with much before, but which evoked a fiery sunset. I took a Jumbo tag, painted with some Nougat, which is an opaque Fresco Finish and makes a good base and then took translucent Frescos in Autumn Fire, Yellow Submarine and Tango, watered them down and then swiped my tag across the watery blobs on my craft mat. I heated the tag to dry it and used misters to spritz my tag until I liked the background I had created. I had decided that my letter would spell 'Glow' and that is what I wanted my tag to do!
I kept adding layers of translucents with a sponge and, although my marbled effect was less apparent, it was still visible. I then edged my tag with some dry-brushed London Bus and French Roast. I have some Crafty Individuals stamps of trees with tiny birds gathering in their branches, so I decided to showcase these lovely images on this tag. I stamped them with Onyx Black Versafine onto card sponged with Yellow Submarine and Autumn Fire and then sprinkled them with clear UTEE and heated. I wanted the black to really gleam against the fiery background. The little sun is from a Paper Artsy, Lynne Perrella plate.
I stamped with some script from Paper Artsy Hot Picks and used my Tim Holtz Worn Alphabet with Black Archival on some more of the card I had painted. I edged my tag with Gold UTEE.
The little birds in the grass are from a Hot Picks plate, stamped onto the tag in Wendy Vecchi Fern Green Archival and then clear embossed. You may just be able to see that I added a hint of Hey Pesto to this area of the tag. I had thought of edging my tag with black lace, but I wanted to keep the bold black contrasts that echo the tree silhouettes so I stamped the Lynne Perrella banners onto what remained of my card and added these as a trim. Some tiny punched out leaves, accented in Treasure Gold complete the tag,which I finished off with seam binding dyed with Fired Brick, Walnut Stain and Aged Mahogany distress inks.
 I do hope you like my take on 'Birds' in  the 'Glow' of sunset. Have a great day wherever you are. Perhaps this evening you'll see a stunning sunset and a sky filled with throngs of birds. All we have to do sometimes is look up.