Saturday 30 November 2013

Jo so Inspiring!

Hello and a warm welcome to Magpieheaven. I've been busy helping my mum with correspondence and making her new flat homely, but I've still found time to craft and to enjoy looking at all the beautiful Christmas makes around Blogland. This week over at Paper Artsy Jo Myhill has created some fabulous Christmas creations and at Fashionable Stamping Challenges there are some lovely Shabby Chic Christmas themed makes. I should like to enter both these challenges with this blog post.
I loved Jo's Paper Artsy  house that she created for her tiny, vintage Christmas tree decorations. I have some of these and it's years since I used them on the tree. As Jo said, they are so mini they tend to get lost among the branches. I find Jo's work so inspiring that I really wanted to play along - I loved what she did with Grunge Paste and glitter on her canvas too. I don't think I could have fitted one of those little houses, gorgeous as they are, into Magpieheaven...but on Thursday while shopping at the Range for new home-ware for my mum I saw these little wooden decorations just begging to be altered!
If you click on the image you will see that I've placed one of the little wooden decorations in the middle. I had intended using them on these little bird-houses - maybe sticking them into the the circles in the centre, but when I played around with them they just didn't look quite right. In the end I put them aside for another project. As projects often do with me, these houses were starting to tell me exactly what they wanted me to do with them! The two techniques I wanted to play with from Jo's projects would fit well with an idea that was forming itself - little, shabby-chic Christmas bird-houses decorated with Russian dolls. I painted the roofs with Little Black Dress Fresco paint; Old Gold and French Roast because I wanted to see if the Crackle Glaze would appear very much different with differing colours underneath. I also punched out some lace with an X-cut border punch and painted this Old Gold. Lying it across the roof I liked the shabby effect this created, especially as the card was green and I did not cover it entirely.
I then stamped the Lynne Perrella russian doll from LPC016 onto some white tissue napkin backing and painted it on the reverse side with Frescos. I've wanted to use this stamp in a different way for ages, but I was never quite sure of an original way in which to incorporate it into a make. I love it because it reminds me of my honeymoon spent in Moscow, twenty-six years ago - Mr Magpie and I ate Caviar on Christmas day and watched the snow glittering on the golden cupolas of the Kremlin.
Before sticking my tissue dolls onto the houses with Satin Glaze, I tried out Jo's idea of spraying with Frescos and a little water. I painted the houses with Nougat first, edged with just a touch of London Bus and some Distress Inks - Vintage Photo and Evergreen Bough, then sprayed with Lake Wanaka and Antarctic. Mr Magpie and I bought lots of presents on our trip all those years ago, but I treated myself to this little lacquer box, which I loved because it seemed to be illustrating a story: I would love to know what it is. I wanted my houses to look as if they belonged to the same world as this box and also the forests and wooden churches we had passed on our train journey from Moscow to Saint Petersburg. I used Grunge Paste and Classic Treasure Gold through a stencil of snowflakes, which I made with what remained after punching out snowflakes. I was a bit too nervous to create the really thick, 3D background that Jo did on her heart creation, but I did add some dry distress glitter to my Grunge Paste.
I was really pleased with the effect of the spray painting and the Crackle used with script which I adapted for the roof. I kept the heart theme, but created my hearts - and leaves too - from shrink plastic painted with Frescos and stamped with Paper Artsy images: Ink and the Dog, Pierrots and the lady from LPC 004. I added lots of Shabby Blue Frantage, which I just can't do without on my Christmas projects at the moment. I painted the the wooden bobbles with London Bus and some Rose Quartz Treasure Gold so they looked like winter berries. I kept the coarse string as it had a shabby chic look.
 Because the Russian Matryoshka doll had a hole in her tummy I really wanted to create another little doll to fit inside, but this would be so difficult to do properly. Then I had an idea! These are bird houses - those holes could be a little door for a robin to pop in and out of. I painted some curled wire with Gesso and added Frantage and made shrink plastic robins by die-cutting the Tim Holtz cage bird and turning him into a robin with alcohol inks.
 I also made shrink plastic snowflakes and placed tiny green gems in the centre. The robins have green gems for eyes too. I am gradually making the mantel-piece into a winter wonderland and these little houses are hanging over the fireplace. I should like to enter them for the Paper Artsy Challenge and the Fashionable Stamping Challenges, Shabby Chic Christmas. Thank you so much for stopping by and taking a look at them today. I hope all my visitors have a lovely creative weekend!


Wednesday 27 November 2013

Dragon's Dream Tag it on Challenge - A Book, A Stencil/Mask, Paint and Green.

Hello to those who are popping in for the first time today and welcome again to those who may have already visited! I don't usually do two posts in one day; but this week I am very excited to be a Guest Designer for The Dragon's Dream Tag it on Challenge. Today the new Challenge is set by Gabrielle. Please click HERE if you to see the great inspiration from the Dragon's Dream Design Team. The recipe is A Book, Stencil/Mask, Paint and Green. Here is what I came up with.
This is a Christmas themed tag, so apologies if you are beginning to feel you've seen enough of Christmas already! I want to have an arrangement of tags this year in my favourite vase. On each tag I make I will try to include something that embodies Christmas for me and I am really excited that this - my first tag for my Advent vase - is going to be part of the Dragon's Dream TIO! Without further ado, then, I'll explain how I interpreted the recipe. First, the book! 
As visitors to Magpieheaven will know, I love fairy-tales and my favourite, one that I will always associate with Christmas is Hans Christian Andersen's 'Snow Queen'. In the story Little Girda's quest to find her childhood friend, Kay takes her on many adventures. She is taken in by a kind Princess and given warm clothes and a carriage to ride in, but it isn't long before she is set upon by a Robber Queen. Her little robber daughter helps Girda escape and she is able to continue her journey riding a reindeer.
 Now for Paint and Green! For my reindeer I used some Paper Artsy Smoothy Card painted with a blend of Fresco Greens. Green is one of my favourite colours and Frescos my favourite paints so I have lots! I used the Tim Holtz Alterations die, which I only bought a few days ago. I've been longing to use it; as I think it looks so graceful. I attached it to my tag with foam pads so that it would appear to be leaping into our world. For Girda I painted some card with Paper Artsy Fresco Finish in Tinned Peas and 'knocked back' with some Snowflake. I then clear embossed a Lynne Perrella stamp with some Olympia Green Versafine ink. I used some Stampendous, Shabby Blue Frantage on the image to look as if Girda's furs were snow-covered and thick frantage over Snowflake paint and Gesso around the top of the card with some curly white wire painted with Gesso. The leaf is actually a very pale green. Some of the paler shades do seem to have photographed as more blue than green.
The word 'Believe' was taken from the same Lynne Perrella plate. In all her years of painful searching for her friend, Girda never ceased to believe that they would some day be reunited.
 I was pleased that the image from the LP plate included these roses, as Kay and Girda had a special rose tree that they tended together in the story. When Girda eventually finds her beloved Kay he is captive to the Snow Queen who has set him the task of making the word 'Eternity' from the ice crystals in her palace. The Tim Holtz 'On the Edge' die made a perfect symbol for these. I used Ranger Distress Glitter on them and on my reindeer.
 I am so in love with this product for Christmas, as it glitters like frosty new snow, but it is difficult to photograph the effect. For my background on the tag, I used a Clearsnap stencil to create the impression of a forest: it is actually described as a Mascil, so I suppose that makes it both 'mask' and 'stencil' and I'm using it a lot at the moment because I love the misty effect that can be created with it. I painted with a blend of Sage, Guacamole and Hey Pesto Frescos and then sponged over them, through the stencil with the lovely wintry green of Evergreen Bough Distress Ink. I tinted my seam-binding and lace with this and a little Peeled Paint. Finally I accented with some pearls. The torn papers backed with Treasure Gold, Green Amber are distressed Bo Bunny papers from the Gold and Silver range. Many thanks to the Dragons for giving me the opportunity to dream with them as a Guest Designer this week and Thank You for taking a look at my wintry take on A Book, Paint, Stencil/Mask and Green.

WOYWW - Help - it's heading this way!

When our children were small I remember receiving a letter from their infant school requesting help with costumes for the Nativity. The letter opened with the words, 'The Infant Nativity is Fast Approaching...' Mr Magpie and I laughed at this, as we imagined some kind of crazy wagon bearing tots as shepherds in their stripy bathrobes or the 3 kings in their Lurex and spangles, Mary with her baby-doll, Joseph complete with fake beard and a myriad angels with their wire hanger tinsel halos, careering madly towards us to the accompaniment of piped Christmas carols. Well, Christmas feels like it's careering madly towards me at the moment, even if those Infant Nativity days are long past! And what do I have on my work bench? If you think I've gone quite mad you're probably right! You'll find out why I'm using the acronym WOYWW in my title if you pop over to the noble Julia's Stamping Ground. Why I choose to see the approach of Christmas as a herd of Nativity performing youngsters ...well, all I can say is, the Nativity was lovely when it was performed and Christmas will be just lovely when it arrives, whether I'm ready for it or not! Here then is the top of my washing machine this week! It's going to be a short post because, as I'll explain in a moment, I'm going to be posting twice today.
Here are the chocolate boxes of yesteryear that hold my little embellishments. There's a sneaky peek of a tag for the Dragon's Dream TIO over to your right! I'm a Guest Designer there for a little while and I'm really excited. I'll be blogging this later today so you are very warmly invited back later for a proper look at my take on the recipe for this challenge. This is the reason for the two posts. I am so addicted to WOYWW I just had to have my fix. What have I been doing this morning? I should be feverishly making batches of Christmas cards, but so many nice people last week suggested I 'chill' about that one, so I'm taking their advice. Craft is going to continue to be the fun part of my life. They'll be special cards for special people and I will try to get on with those in a minute, but then there's no harm in Charity Cards for a good cause as Alison pointed out to me last week. I've been storing away embellishments, as both Kimmie and Kezzy sent me some lovely Happy Mail. I'll not be showing you Kezzy's (in the blue box) yet, as I have some special plans for that in the New Year!  In the gold chocolate box at the back of the picture is a doll's head I bought from a junk shop when I was 17! It looks as if it comes from the nineteen-twenties to me, but I can't be sure. I've never wanted to use it because I believe it's so old, but I'm feeling seriously tempted to use it after all these years. I realized that I have lots of lovely shiny bottle tops too! Now there are so many projects they could be useful for....and I could combine those with that little head in some kind of art doll! Even that ribbon with 'Fragment' stamped on it could be used. I feel a project totally unrelated to Christmas taking over!  I wonder what's on your work desk today?I'm later posting today, but I'll do my very best to get around to as many desks as possible and see! Have a great, creative week.

Saturday 23 November 2013

Escape to Narnia - Inspired by Liz Borer

Hello to my very special followers and visitors to Magpieheaven. Thank you so much to all the lovely bloggers who stop by and leave such encouraging and heart-warming comments and who inspire me with their beautiful posts. I feel so very blessed in these wonderful new friends! Today I've been inspired by Liz Borer over at Paper Artsy! I can't imagine who wouldn't be - her work just leaves me speechless. I can't begin to emulate her exquisite creations, but her two projects sparked an idea of what I would like to do with a couple of little blocks of MDF I had.
Sorry about the shadows! They are little models of the doors Kevin is making (eternally!!!) for the Magpie Kitchen. I had been planning to turn these into some kind of diptych and looking at Liz's work, I thought 'I'll try out some of those techniques, but I'll adapt them to Christmas' and I'll play along with the Arty Inklings blog at the same time. Then the doors reminded me of a tiny wardrobe; a wardrobe made me think of 'The Lion, the Witch and the Wardrobe' and well, I just had to make some doors into Narnia, didn't I?
I remember sitting entranced in my primary school class on a Friday afternoon in December with darkness and sleet outside the window while C. S. Lewis' fantasy worked its magic on my imagination. In the story, the children enter Narnia through a perfectly ordinary, rather dull wardrobe, but I decided to just suggest the world of Narnia on the doors - I turned things inside out, I suppose! The wonderful blues and Grunge Paste of Liz's first piece inspired me, but I also had a go at painting some textured branches, berries and winter leaves with Grunge Paste. Liz made this look so easy, but I have to say I found getting the consistency right and applying very, very difficult! More practice and study of Liz's post needed! Rather than creating the exquisite flowers Liz produced, I went for a more impressionistic look to suggest snowy boughs. I used Frescos in Snowflake, Antarctic, Lake Wanaka and a touch of South Pacific. I coloured the Grunge Paste with a hint of Antarctic. Followers and visitors may know that recently a collection of stamps I designed for a friend came to light in a clear-out. These cannot compare with the wonderful designs from the Paper Artsy artists; but I've had lots of fun using them after all this time. The two little trees in the centre panels are my designs like the winter princess I used on my snowy notebook. I suppose they are a little more Tolkein than Lewis, but the two men were both part of a club they named THE INKLINGS! The berries are coloured with Winter Berries Distress Ink to give just a little 'pop' of colour. I also used Shabby Blue Frantage and Distress Glitter and some Gesso to create a snowy feel to this land where it is always winter, but never Christmas. I should like to think this is a glimpse of Narnia when all that is about to change, especially as the intertwined trees have little faces and are coming to life again!
I added highlights and detail to my 'artwork' with a Posca pen in white and some White Fire Treasure Gold. I was inspired by Liz's wonderful techniques of blending and shading with Frescos. I attached my little doors with two hinges die cut from metal coated card and accented with little pearls. For this I used the hinges from the Paper Artsy Hardware1 die.
And what do we find when we open the wardrobe doors? This Paper Artsy stamp of an Edwardian schoolboy from 'Ink and the Dog', Schooldays Plate 1 reminded me of the young C. S. Lewis. As you probably know he lost his mother to cancer when he was a boy and he spent much of his childhood inhabiting imaginary lands. So many of his beautiful fantasies found their way into 'The Lion, the Witch and the Wardrobe', so that the dreams of a lonely and unhappy little boy became the material for a novel that would delight and enchant adults and children for over sixty years.
 I wanted to create the impression of young Clive looking out at a snowy world from his window. I embossed these snowflakes from Artistic Outpost 'Snowy Woods' with Wow white embossing powder. The background music notes are stamped in Wendy Vecchi Cornflower Blue and they are from a lovely Paper Artsy Eclectica plate 07 by Sara Naumann. The window is a Spell-binders die-cut considerably cut up and bent into shape. I used Darcy's suggestion from her pillow box and painted Nougat over Old Gold and Little Black Dress. I finished off with some twisted wire painted with Gesso with a tiny frantaged leaf.
I experimented with photographing my 'wardrobe' with the light behind it on my mantel-piece. My goal is to photograph an arrangement with a garland (not yet made), my mini easel and some tags in my vase - also not yet made. I should like to link this make to the Paper Artsy challenge this week and also to the Arty Inklings Challenge to create anything Christmas themed. Thank you so much for stopping by! Have a great and creative week!

Thursday 21 November 2013

In the Spotlight at Our Creative Corner

Thank you so much for dropping by today. I'm sure things are getting increasingly busy for everyone as December approaches so it's really kind of you to take the time to visit today! I've always loved Fridays and today is a really exciting one for me, as this is my turn to be in the spotlight over at Our Creative Corner! I was really thrilled and surprised when a little box I made with a pierrot at the heart of it was chosen in the 'Forgotten Things' OCC challenge. Ever since I discovered Our Creative Corner, I've been enchanted by all the beautiful projects their DT create and very impressed by the high standard of the entries to their competitions, so I felt quite nervous as well as excited about being asked to step into the limelight! Laura asked me to make something for my Guest Design Spot and here is what I did. It is a little MDF money box that I bought on a very happy visit to Ally Pally back in September when I met some of the lovely bloggers I had until then known only by name .
To begin with I sanded the little box with a sanding block until it was smooth when I gave it a good two coats of Fresco Finish Snowflake paint. I then applied a coat of Sage Fresco Finish. A little while back I discovered that some of the Fresco blues if applied over Sage have a really nice effect. I then mixed a little blue Fresco, I think it was Lake Wanaka, in some Grunge Paste and applied this through a Crafter's  Workshop ledger stencil. I painted my box, apart from the lid/roof, in a blend of Mermaid and Sky with just a dab of South Pacific at the edges.
I then took a Paper Artsy stamp, the script one from HP1006, and randomly stamped with Wendy Vecchi Cornflower Blue. I wanted an uneven look, so I used the stamp without a block. The leaf you can see in this picture is die-cut from a Tim Holtz tattered leaves die, painted with Fresco Chocolate Pudding and edged with some Treasure Gold. I also lightly stamped script over it in Potting Soil Archival. Then it was time for some fun with Crackle Glaze and Shrink Plastic - two of my favourite crafty things! First the Crackle!
 I love to watch as the crackles creep across the surface of a project, revealing the colour beneath; this time it was Little Black Dress under Mermaid! I edged this with some White Fire Treasure Gold. The edge was a bit of an experiment. I had a little Shrink Plastic left over and didn't want to waste it: what to do? It was painted with a thin coat of 'Tinned Peas' - I like to use fabric medium to thin acrylics when using them on SP, as this seems to aid the flow of the paint. I cut it to fit the corner of the roof and stamped the script from Paper Artsy Mini 26 on it: I quite liked the 'shabby' look of this, like some make-shift repair with whatever came to hand. Sometimes I like to glaze SP, but for this project I preferred the matte look mostly. So how else did I embellish with SP?
I die-cut some tattered leaves from Shrink Plastic painted with 'Tinned Peas' and stamped these little faces from a 'Lost Coast' time-themed stamp. These reminded me of Swiss Cuckoo Clock decoration, so I die-cut a Shrink Plastic pocket watch and stamped it with the image from Paper Artsy 'Ink and the Dog',
Petals Plate 3. This time I glazed the centre image with some Glossy Accents leaving it to dry overnight.
For the finishing touches, I added a Tim Holtz, tattered pine cone rose made from heavy card, painted with FF Blood Orange and then a warm copper tone of Treasure Gold. I used the same Treasure Gold around my pocket watch and added to this a little Prima rose coloured with Aquamarine Treasure Gold and some red pearls. I made this money box long before I started to think in terms of festive makes, but Mr Magpie said it had a Christmas look to it and that the red pearls reminded him of holly berries. My friend, Lucy, from 'True Colours' suggested that I save in this for the next Craft Show. Well, maybe I should keep any Christmas gifts of money in it and spend them on some beautiful crafting materials in the New Year! I wonder what the sales might have in store for Magpies who can't resist anything bright, shiny and crafty? Thanks for dropping by to look at my Our Creative Corner Project and have a great and creative weekend!

Wednesday 20 November 2013

WOYWW - Making a Start!

Hello and welcome to the Magpie's Work desk today! It's still the washing machine top in the conservatory! Sadly, Kevin has broken the news to us that there is no way he will be able to finish the kitchen by Christmas. Ah well, we have half our cupboards, an oven, a fridge and although the sink is old it still works, so never mind! Christmas will be fun and you're still all invited to a huge blog party when the kitchen is finished some day in the New Year! Everyone has been so patient that I think I'll give out blog candy on the day it's finished to say thanks for listening! Thank you so much as well to all those people who left such kind and encouraging comments on my first GD project. WOYWW 'deskers' are the best! As you will see, I have laid out as much of my Christmas stash as I can to encourage myself to make a proper start on cards, decorations and so on! Why, you ask, are you doing this? Well, hop over to the lovely Julia's Stamping Ground, where you will discover why we 'deskers' reveal what's on our desks, tables, floors - crafty spaces whatever and wherever they may be on a Wednesday!
As you can see on the bottom right I have made another card, which I have entered in Anita's Swanstitch Christmas Challenge. Click Here if you want to see this in more detail and also all the lovely Christmas makes entered so far. So what am I planning to do with my bits and pieces here? I have an idea for creating a garland to decorate the mantel-piece; some tags to hang from branches as a kind of Advent Calender and some tags for presents and cards. I wonder if I'll manage it all! Can you picture how I'll use this little lot to make these Christmas plans come to pass?
This little robin by Prima is my favourite brad and I'm saving it for a special card or Christmas make. The little bottles remind me that I have a question. Is anyone in contact with Kimmie Hogan? Kimmie, if you're reading this, please could you comment or email? I know that Kimmie has not been too well, but last week I received a package from her full of treasures: crystals, a tag she made, these little bottles, lace and ribbon. I want to email her to say 'Thank You' but I can't work out how to contact her through Google+! It would be great if I could hear from you, Kimmie so that I can check you're all right and so that I can let you know how much I appreciated your lovely gift to me. I am now sticking some more of my own design stamps onto Ez Mount, so I shall be using some of the tree ones on a project soon, thanks to the encouragement I've received from all my blog friends. Thank you so much those who stopped by and left the kind comments on my frosty princess! I'm off now to peek at some desks around the world! Thank you so much for your visit! I will try to get round to as many desks as I can today.

Tuesday 19 November 2013

A Christmas Challenge!

Hello and welcome to Magpieheaven and welcome to my newest follower, Sam from 'Hettie Craft'. Christmas preparations are about to make an appearance here I think! I thought I was never going to start making cards, as I am such an easily distracted Magpie. One thing I love though is a challenge! Over at the Arty Inklings blog, there's a Christmas Challenge and not one but three beautiful prizes! Click here to find out more! There are some gorgeous entries and some entrants have managed more than one Christmas themed creation - Jacqui, I think, has excelled herself with four beautiful projects. I set myself the task of creating another card. Not much of a challenge, you might say, but you don't know how easily distracted I can be when it comes to card-making! In order to keep 'on task' I challenged myself. I now have some lovely Christmas paper and three beautiful plates of Christmas stamps, but I decided that I would try to create a Christmas card using non-specific stamps and a tiny scrap of Bo Bunny 'Snowdrift' paper I had left over in my stash from last year. Here is what I created for the Arty Inklings Christmas Challenge!
I used some Ranger Core-dinations canvas style paper in a Peacock blue to give me a nice strong, colourful background to work against and texture without making the card too bulky to mail. I bordered my top and bottom with a Tim Holtz 'On the Edge' snowflake die painted with a blend of Frescos: Ice Blue, Mermaid and a touch of Inky Pool. I then used gems and frantage and Stickles to add a frosty feel. I die-cut some baubles using a Spell-binders die and a little Paper Artsy bird from my last year's paper scraps. The script in the background is a Crafty Individuals stamp used on tissue painted with Frescos.
I love Lynne Perrella's mysterious ladies and I noticed how this image seems to emerge from wonderful embroidery, sequins and beading and to suggest all the glamour of a Liberty Christmas display! To make her more festive, I gave her a party hat, which I highlighted in a white Posca pen.
I used black Archival ink to stamp my ladies. The Lynne Perrella images are from LPC 009 and the party hat is from LPC 003. I turned the coin from 009 into a bauble too!
I didn't want the little bird to be just hovering so I made him a snowy branch from Posca pen with Frosted Lace Stickles and a blue gem for an eye. Thank you so much for dropping by today and taking a look at my latest card attempt. I should like to enter this for the Arty Inklings Christmas Challenge.

Monday 18 November 2013

A Mini Christmas Easel!

Hello from Magpieheaven and I hope you are all keeping warm and cosy whatever your nest happens to be! My thoughts are still with those suffering the effects of the typhoon in the Philippines and now also with those affected by the devastation in the Mid West of America. It was a bit of a gloomy day yesterday so I wanted to cheer myself up with some Christmas craft. This is something I made in between cooking Sunday lunch for the family, which now includes my mum who we can collect to come and share our Sunday meal with us. I had intended to start my Christmas cards, but somehow whenever I begin - with the best of intentions - I become distracted and find myself engaged on another project! This time I was all set. I had just received some lovely new Artistic Outpost stamps and I was ready to play! Then I saw a large piece of corrugated card and I started to experiment. What I found myself creating would be impossible to mail, but I decided it would make a nice centre-piece for my mantel piece which I'm planning to decorate with a garland. Here is how it started!
I played with my corrugated card, cutting out a square and tearing off the surface layer then experimenting with Gesso by Claudine Helmuth, Fresco paints in Cinnamon and Blood Orange and some Rose Quartz Treasure Gold. I also had a mini wooden easel which had come with a little canvas from The Works. I love these for displaying tags and I started to wonder ... what about if I decorated it, altered it so that it became a part of my corrugated Shabby Chic Christmas project? This is where my playing took me! Please click on the images that follow, if you would like to see in more detail: it was a mini project and quite difficult to photograph, as I went crazy with the frantage and Stickles! I do hope no-one had Mica flakes in their chicken casserole!
First I Gessoed the easel liberally, making it as splodgy as possible. I then applied Shabby Blue and Shabby pink Frantage to the easel and heated this until it glittered frostily. Then I had a play with something I've never used before. I love the way that Laura and Alison Bomber use wire so imaginatively on their projects. I wanted to see how wire would look daubed in Gesso. Mr Magpie kindly let me have a roll of thin wire from his tool cupboard as we passed in the hall - him off to lay paving stones in the garden, me having just made the roux for the casserole! I curled the wire around a pencil and then I found that I could attach it to the big blobs of Gesso and it soon became a part of the frame! I frantaged these wire 'vines' too and that both integrated and secured them!
I then punched out some little leaves from card, which I painted with Fresco 'Ice Blue' and touched with White Fire Treasure Gold and a little sprinkling of frantage! Then it was time for some fun with Shrink Plastic - still one of my favourite craft materials! I die-cut some leaves with a Tim Holtz tattered leaves die, having first painted and scored the Shrink Plastic. I used Fresco Guacamole because the colour deepens when you heat the plastic and this is a nice pale shade of green. I used Frosted Lace Distress Stickles on my leaves and tipped them with more Gesso. I also accented them with red pearls that remind me of holly berries. I've found that Polyshrink translucent shrink plastic is really good; it seems to work well nearly every time! I also cut some that I had left over into the shape of a tag. I tried die-cutting one from the Tim Holtz tag die, but it did not really shrink small enough for my mini-project. I stamped this with the lovely Santa from the Artistic Outpost 'Snowy Woods' plate, which I love, using Wendy Vecchi Potting Soil Archival ink.
I used another of these images from Snowy Woods as my central image. I fell in love with this stamp and I knew I had to have it when I saw it on 'Paper Profusion's' blog used so beautifully. I stamped it onto card with Potting Soil Archival, the card was sponged with Fresco Snowflake and a touch of Spruce Distress Ink. I then embossed one of the snowflakes from the Artistic Outpost set with Wow embossing powder in white, just sponging with a tiny amount of Cinnamon Fresco to highlight it. I embossed the wreath from the set in Wendy Vecchi Fern Green, colouring the bow with a red Sharpie and sprinkling with frantage. I attached it with foam pads. I then added three snowflakes from the plate, Spruce embossed with clear embossing powder and Stickled and given gem centres. The Sentiment appears on the image, but I stamped it out again and curled the edges to give a more 'vintage' look. I also added Rose Quartz Treasure Gold to the curled edges of my central image. I echoed the curls of wire by adding curls of paper from the edge of the thin card I used for my central image. They are Snowflake and Cinnamon, edged with Tim Holtz Vintage Photo. I added a gauze, white ribbon and a scrap of red gingham for the Shabby Chic look.
As all the images on my project are from Artistic Outpost I should like to enter my project for the Artistic Outpost, November Referral.
I should also like to enter it for the Fashionable Stamping Challenges Shabby Chic Christmas and finally
The Artistic Stamper November Challenge, which is Christmas!
Thank you so much for stopping by today and looking at my little Magpie Christmas decoration. Have a lovely, creative week!

Saturday 16 November 2013

Make a List!

Welcome to Magpieheaven where I'm sorry to say I haven't made very much progress with my Christmas cards! In fact I'm beginning to feel a bit overwhelmed with all that remains to be done for the festive season! Our kitchen still lacks work-tops, a new sink, half the cupboards and it needs to be decorated. Delia Smith in my favourite Christmas cookbook advocates lists and more lists about this time of year, so I decided to create a special Christmas notebook to take my mind off the chaos and to help me feel organized, even if I'm not!
I should like to enter my wintry list book for 2 challenges and it's my first time entering both these!
'Arty Inklings Christmas Challenge' where anything Christmas themed is welcome!
'Simon Says Got Ink?' where a project has to use ink in some way! Both these challenges have provided lots of inspiration for those who want to get into the Christmas spirit and get inky and painty!
I made my notebook by stitching five folded 'signatures' of sketch book paper between two thin canvases. I used cream coloured wax thread and Coptic stitching. For the background of my front cover I painted with Gesso, applying it very thickly in places. I then  used Grunge Paste coloured with Fresco Finish Lake Wanaka through a Crafters' Workshop stencil. I created a lacy, frosted appearance by adding lots of frantage in Shabby blue and accenting the centres of my flowers with pearls and gems. I also used die-cut snow flakes and punched leaves to frame my central image - The Frost Frond Queen.
Now we come to the first example of how I used ink on my project. Followers of my blog will know that the other day my son unearthed some stamps a friend of mine once had made of my designs. The image above is the only one I have mounted on Ez Mount so far, so I have used her a few times now. This time I stamped my 'Leafy Princess' onto a stencilled background on an oval of card. I used black Ranger Archival Ink, which I then clear embossed. The crown, which is from a Paper Artsy Lynne Perrella plate was stamped onto card painted with Fresco Lake Wanaka and Mermaid and then stamped with Wendy Vecchi Archival ink in Cornflower and clear embossed. I used a Posca pen to add white highlights to the crown and a thin layer of Frosted Lace Stickles to the leaves in my Princess's hair along with a snowy dollop of frantage. I picked out some of the background in White Fire Treasure Gold and then went to the ink again, this time Distress Inks by Tim Holtz to edge the tips of my snowflakes and corners of my book with Walnut Stain. I stuck some white lace with a blue glitter on the inside edge of the front cover.I used the snowflake 'On the Edge' Tim Holtz die on the inside edge of the back cover, painted with Lake Wanaka and sprinkled with Shabby Blue frantage.
I Gessoed the back of my notebook, slathering lots around the sides, top and bottom to look like snow. For thisback cover I used my favourite Clear Snap stencil of winter trees and a strip of ribbon with a design of bare trees that I really love.
Here I was really pleased with the effect of using Distress Ink through a stencil I made from the card left when I had die cut the snow flakes on the front of the book. I like the 'barely there' look of the snowflakes, which are sponged Broken China Distress Ink.
Going back to the front of my book, I die-cut this shape, which I painted with Fresco Mermaid. I then stamped with Wendy Vecchi Cornflower Blue Archival, a sentiment from a Lynne Perrella Paper Artsy plate, which I clear embossed and then highlighted with a white Posca pen. I edged with Wendy Vecchi Potting Soil Archival and some more Shabby Blue frantage.
I splodged some Gesso over the stitching and highlighted in places with Treasure Gold and some Shaved Ice Mica flakes and it's all ready for some serious organization - but am I!? Thank you for stopping by today as the days grow busier. Have a wonderful day wherever you are and whatever you have to do!

Wednesday 13 November 2013

WOYWW - Guest Designing and Making my own Stamps!

I've had to write this ahead of time because Wednesday is going to be busy this week, as I've promised my hubby we can have a day out. I will try to get round to as many 'deskers' as possible, but it might take me a while. I've been thinking since I heard the news of the terrible typhoon, of our friends in the Philippines and hoping and praying that all is well with them. Love and strength to Patsy and Peggy at this time.
 Wednesdays have been so special since I started blogging back in April 2013 and Mo, I think it was, told me about WOYWW I've tried not to miss it and this week it's my first time ever as a Guest Designer so I hope you won't mind me featuring what I made for the Country View Crafts Challenge. The theme is 'Letters'. You may not have time with all the Wednesday desk hopping, but if you have a moment, please look Here at Country View Crafts challenge and all the great DT inspiration from their regulars and guests! And if you're stopping by via Country View Crafts and you're wondering what WOYWW stands for, do pop over to Julia's Stamping Ground for a sneaky peek at craft desks all over the world and see why I always look forward to Wednesdays! Anyway this box is on my desk on my washing machine lid in the conservatory right now, where it's light enough to take photos!
 
I'm already using it to store my precious letters from my friend, Kay who lives in Madrid. Most of my faraway friends email, but Kay sends me real letters! I am always so excited when they plop on my mat, full of news, humour and wisdom! The box I used was a gift from my dear friend, Dianne who also lives far, far away in Canada and who shares my magpie love of collecting and creating! We met through WOYWW.
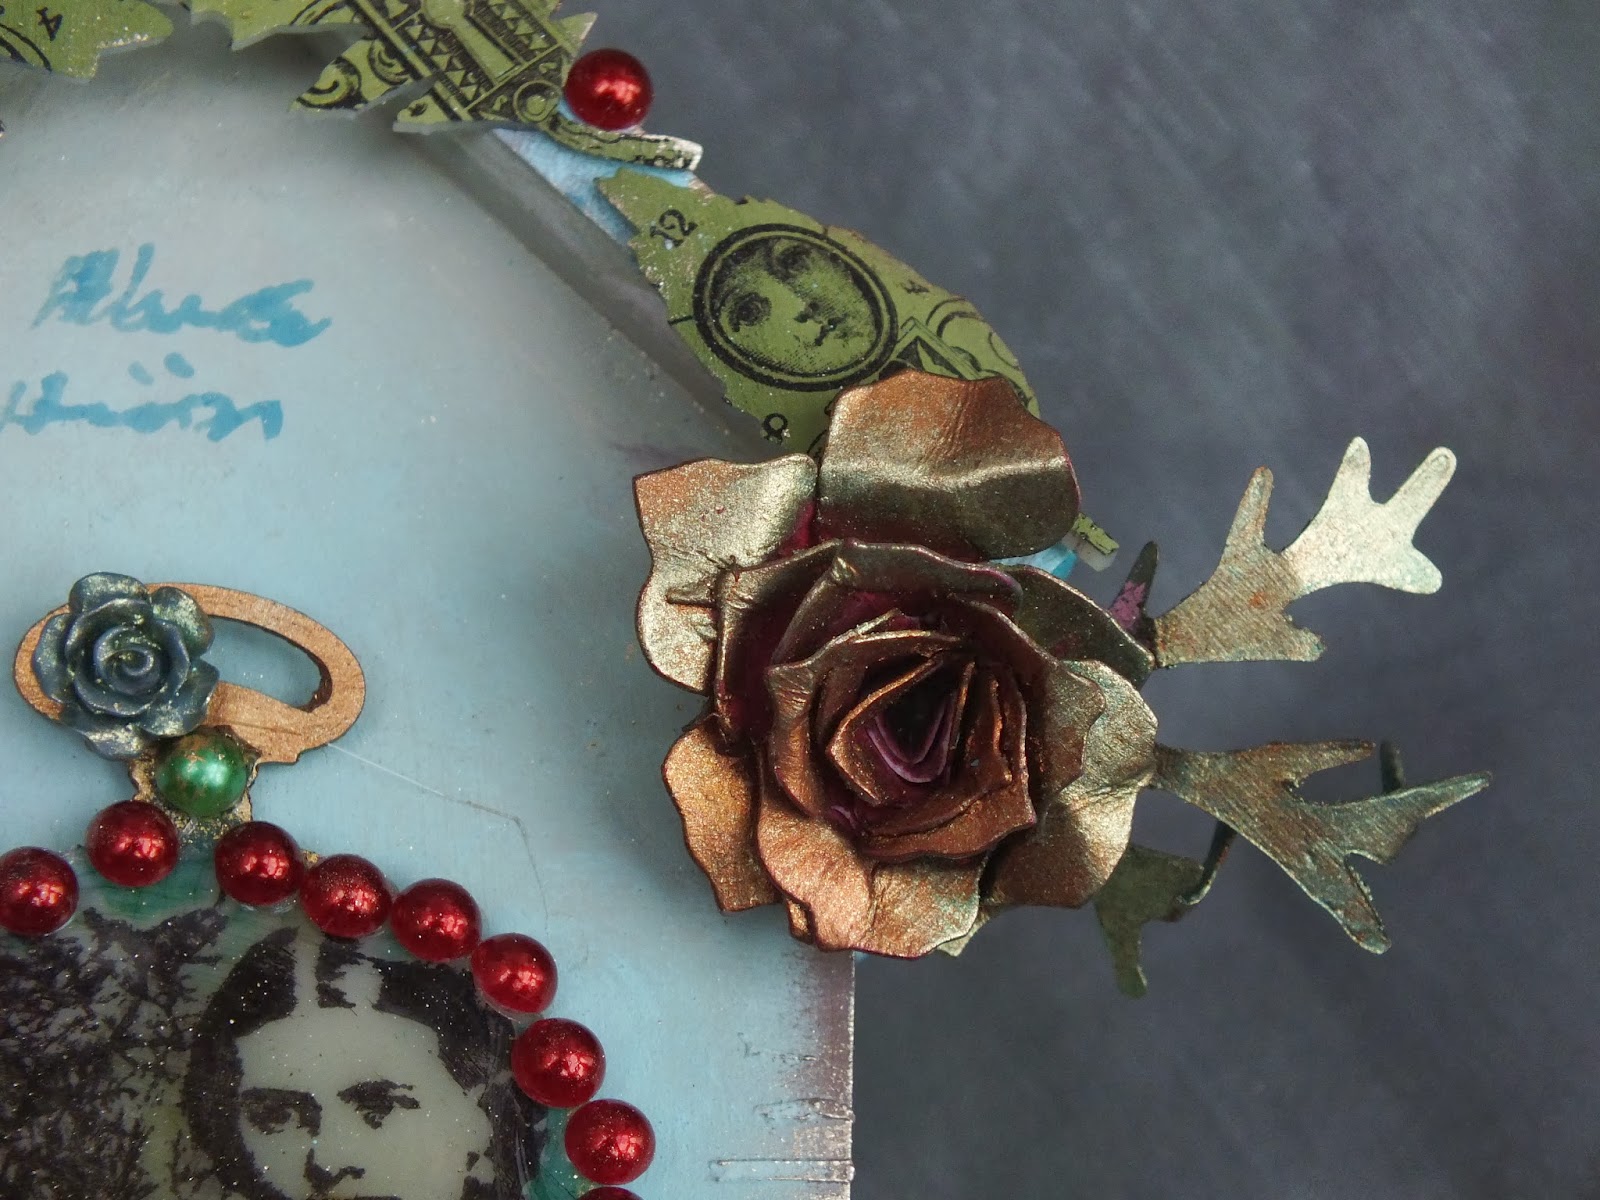
First I painted the beautiful wooden box with Fresco Finish in Snowflake. I then used Grunge Paste through a ledger stencil to create a textured, writing effect. We magpies love feathers of all kinds so I made my own quill pen shape using cardboard. I drew around a real feather for the shape, then moulded and shaped my cardboard cut-out around a central spine of cocktail sticks stuck down with Glossy Accents. I painted again with Snowflake, snipped the edges of the feather and accented it with Fresco Finish Cinnamon, some Mermaid and Rose Quartz Treasure Gold.
I painted the lower part of my box with Little Black Dress Fresco Finish.
 I distressed some pieces of card to look like fragments of old letters, edging them with Wendy Vecchi Potting Soil Archival ink before stamping them with a Paper Artsy script stamp from Hot Picks 1006.
I painted my box with a combo of Lake Wanaka Fresco and Bora Bora, edged with more Rose Quartz and added a Prima brad that resembled  a tiny fragment of text.
The medallions that decorate the top of my box are Paper Artsy Ink and the Dog stamps from the Petals and School Days range stamped on Cinnamon painted on Shrink Plastic and given a coating of Glossy Accents then left to dry and set overnight. I stamped with a Paper Artsy script stamp randomly over the box and also used this to create the letter fragments. I then accented some of the raised letters with Classic Treasure Gold. Thank you so much to Country View Crafts for giving me the opportunity to share what I have made and thanks to anyone who has stopped by to look.
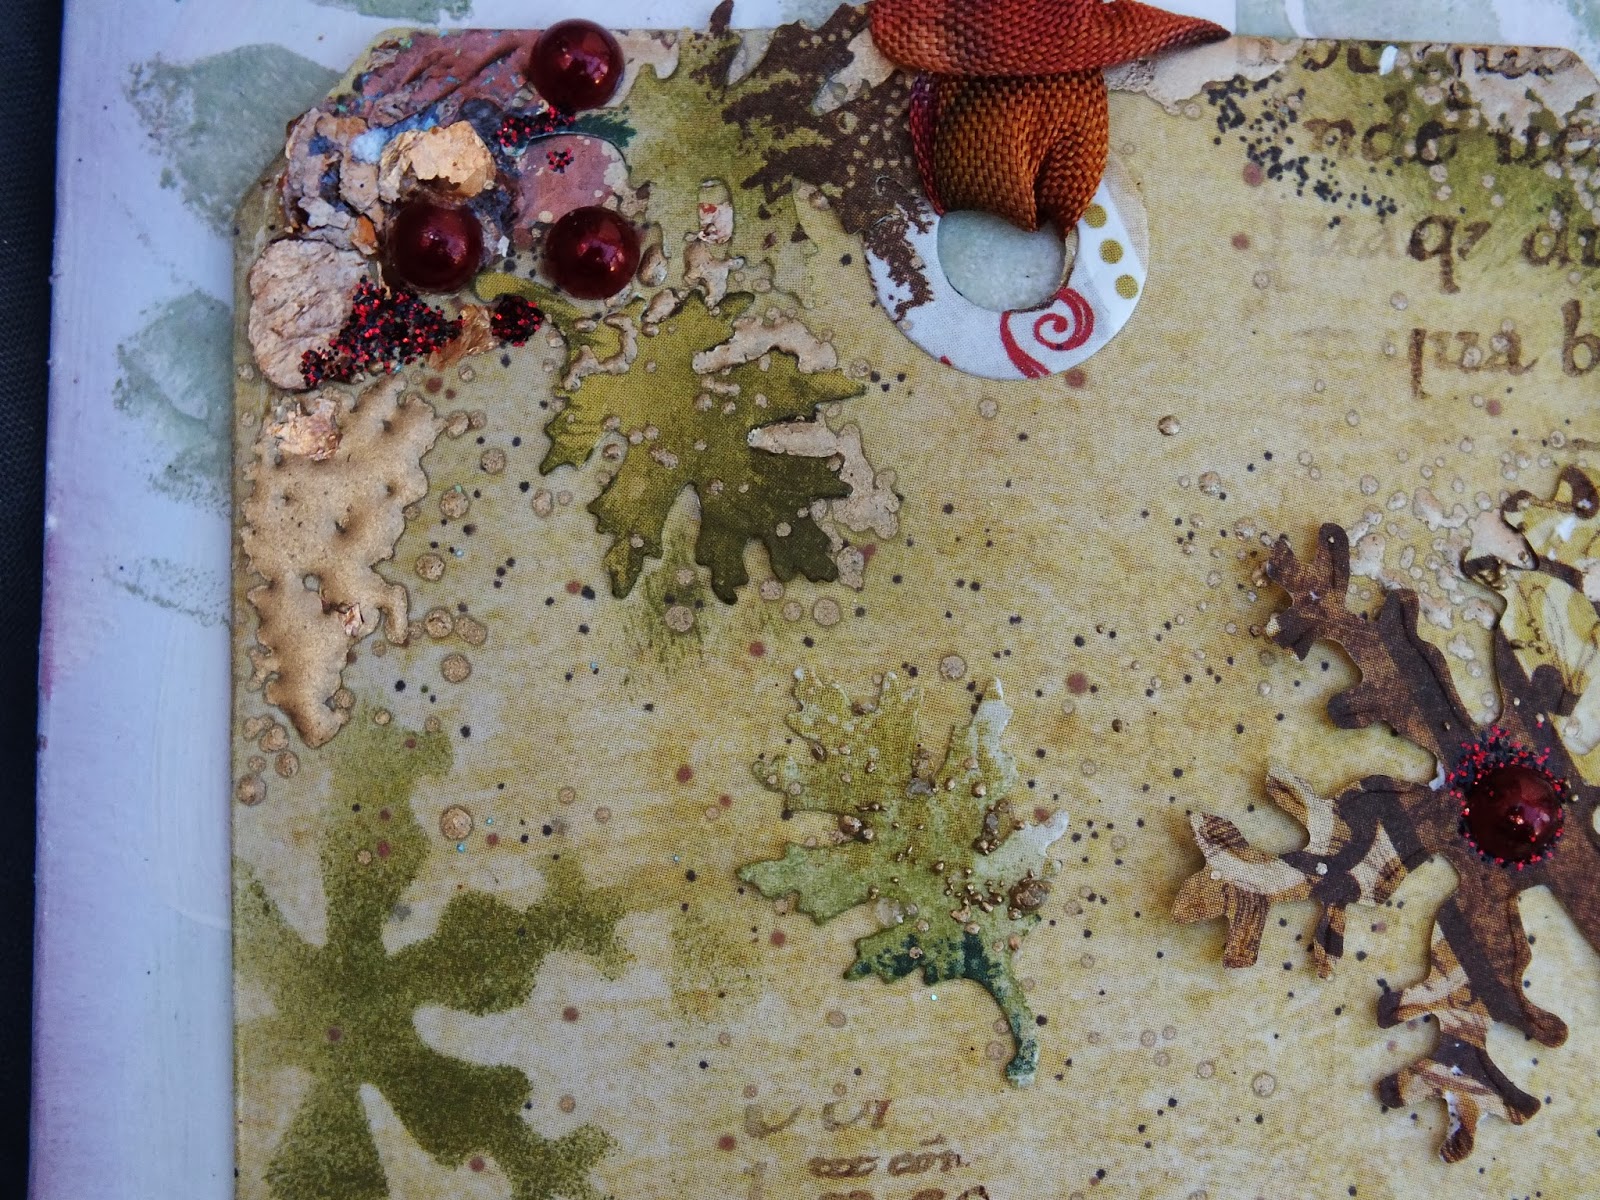
Finally last week I told my WoYWW friends about some stamps my son found in the bureau he was sorting. It was actually my old bureau that had been moved into his room and he now needs to empty it, so we can replace it with a chair. While sorting, he found some stamps a friend of mine had asked me to design a few years ago. She had found someone online who could make up stamps to order quite cheaply, Unfortunately this lady is no longer in business so I don't have a clue where I could go if I wanted any more made. There is a whole box of my doodlings made into stamps, but I didn't have enough Ez mount, so I've only experimented with one so far and here it is- deep breath - eek, hope you like it - it's the tag on the right
She is my Leaf Fairy Princess and I've just had a quick play with stamping her with some Wendy Vecchi Fern Green Archival, clear embossed and looking at how I might use her with other elements. I gave her a Lynne Perrella crown and lots of sparkle to make her more Christmassy, as she's really more of a spring themed princess with her hair made from leaves. The box she was in contains all her court of elves, trees with faces, a Green man and a jester just about to go off on his journey. Next time I will have some more Ez mount so I can show you what resulted from my play with these re-discovered stamps. I also have a sheet of the Green Folk that I have used as background on projects back in the spring when I sent out some WOYWW ATCs. Thank you for being so patient and looking at so much this week, including my own rather amateurish artwork! Have a great WOYWW!

Sunday 10 November 2013

Woodland Walking

Hello from Magpieheaven on this beautiful, sunny winter's morning here! Yesterday afternoon it was pouring hard; mum was having a visit from our dear Auntie Rene and my new kitchen is slowly taking shape, so I actually managed to create a card using some of the beautiful Bo Bunny paper I bought recently along with a Lynne Perrella stamp that I won from a Paper Artsy draw. I would like to enter this for the Artistic Stamper Challenge where this time the goal is to create something for Christmas. This is my first entry for this challenge. I don't have any AS stamps, although a quick look at what they have on offer proved very tempting! No time to buy, though - maybe next time! Here is what I created with what I have.
I made a triple fold card, using heavy white card and then applied a layer of Gesso, thicker in some places than others. I then went over in Fresco Finish Snowflake and added some Frantage Shabby Blue, edging the card with Tim Holtz Distress Ink in Aged Mahogany. I have a new stencil - well it hardly feels new because I'm using it so much - but I just love the effect you can get with it! It's by Clearsnap and they call it a Mascil, so I suppose that's something between a mask and a stencil! This particular design is called 'Winter Tree'. I used Tinned Peas Fresco through it to create the effect of birch trees in the winter woods. There are still a few fragile leaves falling from the trees in December, so I used what was left from punching out a little leaf from my Woodware punch and stencilled some leaves over my background. My colours were being dictated by the warm shades of my Bo Bunny paper. My great loves are cool and icy blues; but this time I came out of my comfort zone and experimented with golds, reds and greens together. The paper is double sided and cordinates well, so I punched out little Christmas trees from an X-cut punch to look like postage stamps. I then used a Lynne Perrella postmark stamp and a sentiment from her Christmas plate, stamped with Versafine Olympia Green onto card painted with Fresco Pumpkin Soup and a touch of London Bus. I clear embossed and accented with Classic Treasure Gold. Because my card is a bit of a Christmas parcel, full of bits and pieces, I tied it together with some seam- binding dyed with Aged Mahogany.
If you flip the card over you will see the image from the Bo Bunny paper that I fell for! I have to confess I was out of my comfort zone with these colours but that deer appearing out of the mist stole my heart! It reminded me of a walk my husband and I took one Boxing Day. We were strolling through the woods when suddenly the silence was broken by a family of deer that magically seemed to appear from the mist between the trees. After a few timid seconds looking at us warily, they were gone. If you dropped by on Wednesday, you will know I felt a little anxious about using these papers - would this be cheating? I have tried to add my own touches by stamping script from a Paper Artsy Mini, edging with DI, adding my own painted and inked leaves and snowflakes cut from a Tim Holtz die and - of course - cutting the paper into a tag. If you click on the image you can see that I carried through the stencil of the birch trees and there is Frantage, Mica flakes and little red pearls to resemble berries.
Here is a close up of the effect on the tag.

I gave my deer a tiny glittering eye with a careful touch of Stickles!
And then when we open the card...As always, if you want to see in more detail just click on the image.
I used a Tim Holtz die this time with Snowflakes cut out of it and contrasting paper stuck over the back. I 'fussy' cut out pieces of the Lynne Perrella image, which I then layered a little differently when I stuck it back onto the tag. She is clear embossed over red Versafine Ink and then the rays behind her image are frantaged with copper.
Although I was using a warmer palette with this card, I wanted to give an ethereal quality to my woodland walk and evoke the atmosphere of a winter afternoon, so I used Sage Fresco for my trees inside the card. When I had finished this card I felt as if I had been for a walk among the trees with the twilight just beginning to drift down through the branches and a final touch of winter sun glancing through. Thank you so much for taking a look today and 'Thank You' Artistic Stamper for all the inspiration from your DT and for running your challenges.