Hello and welcome to Magpieheaven! In the summer I did what I can only describe as a life-changing online class with the amazing artist and teacher, Mary Jane Chadbourne. It was called 'The Imaginarium, the Anthology of an Art Doll'. I learned so many new techniques and met some incredible artists. I made my first three art dolls using wood cut from my kids' old bunk beds! When our lovely neighbours, Scott and Loretta told us they were expecting their first child - or 'children', as they are to have twins - I wanted to create something for them with unusual stamping to create a gift that celebrated fantasy and imagination. I should like to link my little houses to Fashionable Stamping Challenges, where they have an 'Anything Goes' theme.

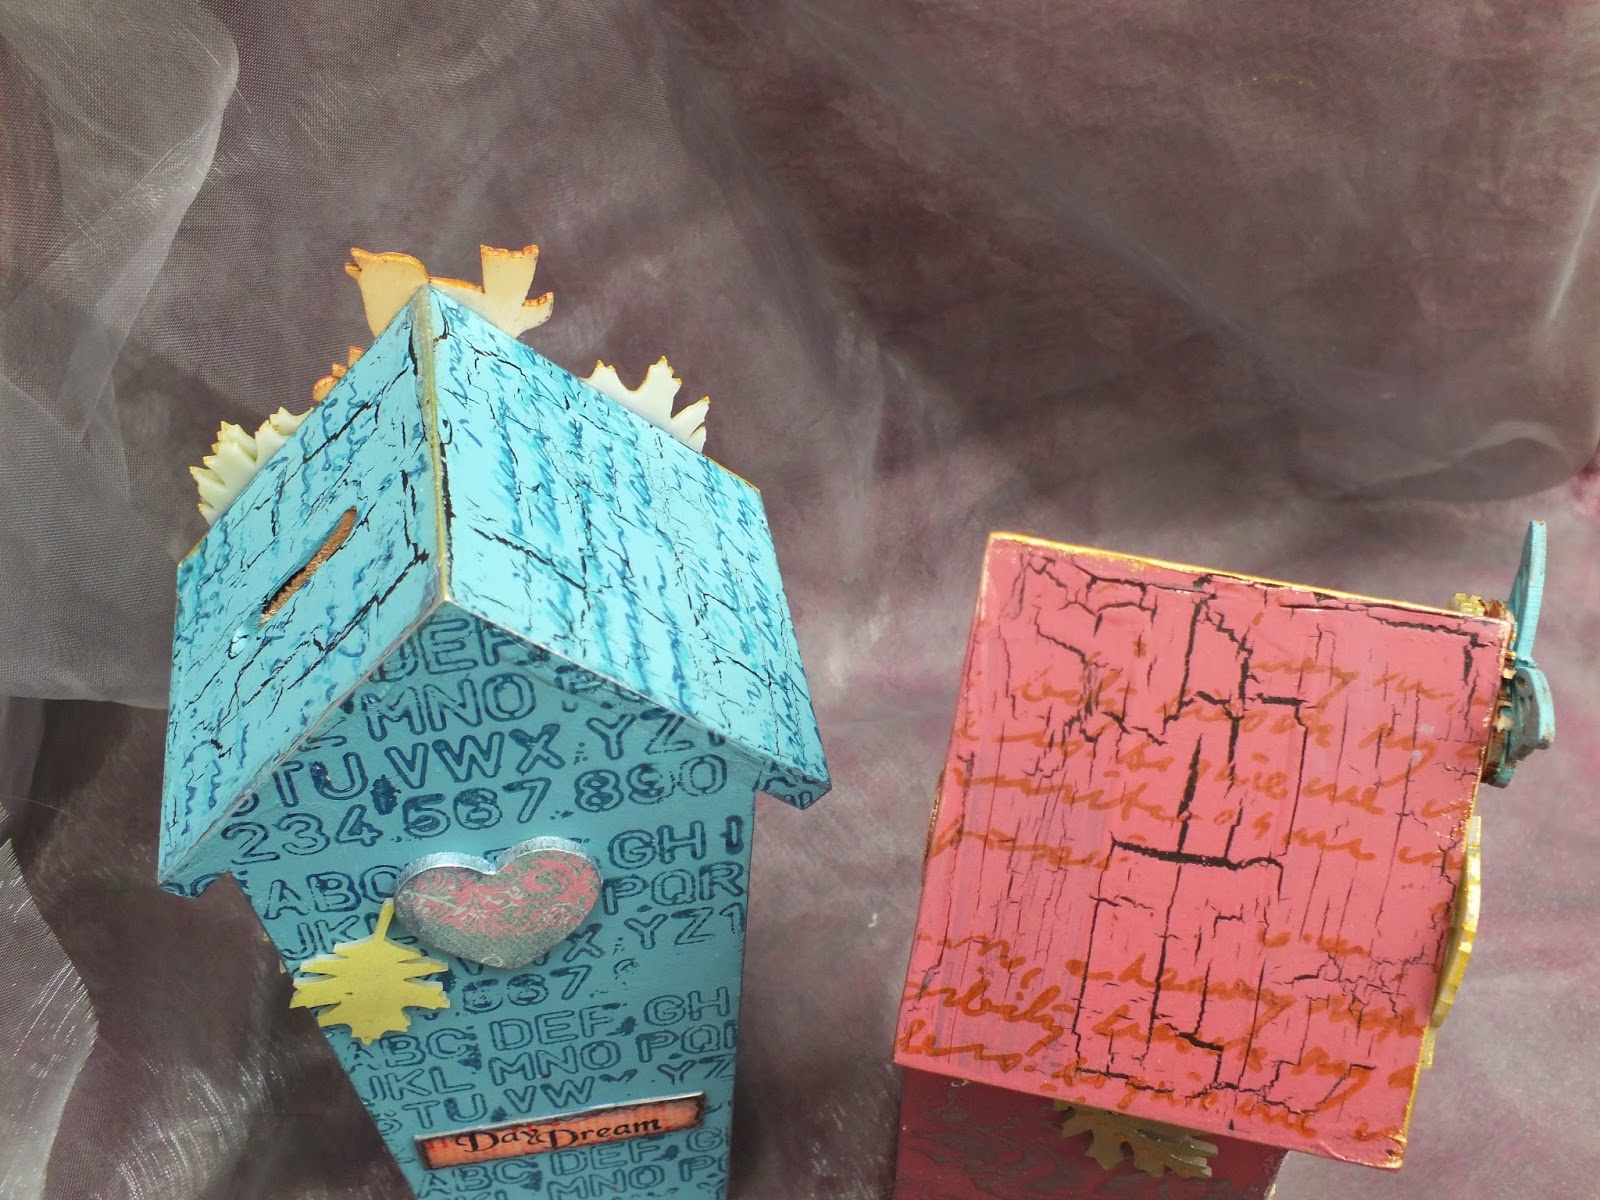
I picked up a couple of little money boxes made from MDF and I decided to create 'Day Dream' boxes for the twins where they can save their coins to purchase the toys, books or materials that will stimulate their childhood dreams. I do hope at least one twin will be saving up for paints and clay!
I won't be going into the full step-by-step, as I used many of Mary Jane's techniques and I would strongly advise you to take a course with her if you ever have the opportunity! What I will say is that these little faces are made from Polymer Clay and they are only the second and third faces I've made in this way. They were built up on MDF heart bases and when they were dry they were painted with Gesso, then PaperArtsy Frescos and finally details added with Water Colour paints.
I chose to use PaperArtsy Fresco paints in Turquoise and Very Berry for the houses. Unlike the Art Dolls, these little houses had more space to decorate on the sides. Anyone who knows me or my blog, will be aware how much I love to use Shrink Plastic for embellishing, so as well as embossing the sides and using Treasure Gold for accent, I added painted Shrink Plastic leaves, cut with the Tim Holtz Tattered Leaves die. You can find my tutorial for creating, painting and stamping Shrink Plastic embellies here.
I think one of those little birds has taken flight and is looking down on the roof-tops, which, as you can see I crackled with PaperArtsy Crackle Glaze and then stamped with the script from PaperArtsy Hot Picks 1006.
I stamped the backs of the houses with the Alphabet stamp from PaperArtsy, Ink and the Dog, Mini 18, and the label encouraging the twins to 'Day Dream' is from a 'Rogue Redheads' plate.
When I first started to create seriously back in April 2014, I bought some stamps that really captured my imagination. They were Sandra Evertson's Petite Whimsies from Stampington. I wanted to include these on the twins' boxes because they seem so fairy tale and so imaginative to me. If I could have been one of the Good Fairies at the christening of Sleeping Beauty, I would have given her the gift of a vivid imagination because I believe this to be the greatest gift.
I painted my shrink plastic with Fresco paint then cut it into the leaf shapes and finally stamped with Sandra's designs in Jet Black Archival before melting. I used different papers on my little projects: Paper Artsy Chatsworth and Sheena Douglass A Little Bit Oriental.
I spent so much of my childhood daydreaming and I'm a great believer in the importance of dreaming. Without daydreams how will we live a life of purpose and vision? It's our daydreams that reveal to us what who we are and what we have to give to the world. I do hope that the twins will fill their boxes with daydreams and that some day those dreams will become reality for them. Thank you for stopping by today. May all your daydreams turn into creativity this week and in the weeks to come.
Just a sneak peek! If you would like to see how this canvas became autumnal...
please hop over to Unruly Paper Arts here. I hope your autumn is full of wonderful colour!
Thank you for dropping by Magpieheaven today. I've been posting quite a few projects lately and I appreciate you taking the time to look at what I've been up to! Last year I made a tag for a young friend of the family who has her birthday a week after our daughter, Matilda's. This year I decided to create her a themed gift using the lovely images from Lynne Perrella's PaperArtsy 028. You might have seen the little handbag charm I created from Shrink Plastic using these images? I keep returning to this material and learning more about how we can get the best results from it. I'm focusing in this post on the heart plaque and the gift box I created to go with them and linking to 'That's Crafty' where the challenge this fortnight is 'All You Need is Love'.
I had a wooden heart - well not literally, of course! I should say, I took a wooden heart from my stash! I gave it a coating of Gesso.
This was to be in place of a birthday card with birthday wishes attached on a little painted tag. I planned to paint one side and to cover the other with House of Zandra paper and a Shrink Plastic charm.
I kept the painted side simple to let the intricate Lynne Perrella lady take centre stage. She is such a dramatic image and I feel she looks quite different every time. This time I used blocks of Fresco Finish paints: Chocolate Pudding, Autumn Fire, Blush and Stone and then accented with Florentine Treasure Gold. I rubbed the Treasure Gold along the edges of the heart too. In this incarnation I think the Lynne Perrella lady looks like the 'divine' Sarah Bernhardt. dressed for one of the roles that would earn her her reputation as 'The most famous actress the world has ever known'. The story goes - and sorry this is a bit grim - that Sarah slept in a coffin to help her prepare for tragic roles! Now that's really putting your heart into your role!

Here is the heart, die-cut from Shrink Plastic that I used to decorate the little box. It's not too difficult to get great shapes and detailed stamping. Apply a wash of diluted Fresco paint to the Shrink Plastic. Before you do this, though, you should take a sanding block and lightly cross-hatch the plastic, first with vertical and then horizontal lines of sanding.
For a good impression and no slipping, it's best to lay the plastic, paint-side down on the inked stamp and then gently press with circular strokes until the image starts to show through. You can punch a hole in your charm if you want one at this stage, as the plastic is still thin and easy to snip. I use tweezers to keep the plastic from flying everywhere and I turn it and gently press with the tweezers as it starts to uncurl. There is this worrying stage where it looks as if it's going to curl into a horrible mess, but patience wins the day and it usually flattens out perfectly if you keep heating and turning the plastic.
Here is the heart on the little box. I wonder what treasure Sarah Bernhardt might have hidden away in it: a pair of diamond earrings given her by an admirer perhaps?
This is just a little papier-mache box, painted with Fresco Guacamole, stencilled with Prima flourishes and then edged with some Florentine Treasure Gold. I used Golden heavy gel medium to fix the heart.
I
It's difficult to capture the effect of the Florentine Treasure Gold in photographs, but it does give the impression that these little creations from wood and paper survive from the romantic Belle Epoque. Thank you so much for dropping by Magpieheaven today. I really loved making this gift for our young friend, Hannah. May you spend at least part of your day doing something that you love.
Hello and welcome to Magpieheaven. It's been unusually quiet in the Magpies' Nest recently! Our daughter, Matilda has flown off to share a house with her university friends and this weekend, the weekend of her twenty-first birthday, she will be away. This is the first time we will not be together for Matilda's birthday so the whole magpie family feel a little strange. Instead of a card I have made her a heart plaque to let her know how much she is loved by us all!
Matilda loves anything with butterflies, so I covered an MDF heart in this beautiful paper from 'House of Zandra' with a butterfly design. I used a little brayer to eliminate any air bubbles and sanded the edges before accenting them in Sapphire Treasure Gold.

As soon as the paper was smooth I stamped the flower sentiment from PaperArtsy's stamp plate E Lin Brown 06 'Live every moment, laugh every day' in Wendy Vecchi's Potting Soil Archival. This sentiment really sums up our daughter. She lives life with enthusiasm and she is one of the funniest people I know! I die-cut some leaves from Shrink Plastic, using Tim Holtz's Tattered Leaves die, having first painted the leaves with a diluted coat of PaperArtsy Fresco in Guacamole. Before melting the leaves with my heat tool, I stamped them with one of the lace backgrounds from Crafty Individuals plate of different lace designs. Both the little wooden butterfly and the lock are Prima creations. I painted the lock first with Little Black Dress Fresco and then applied Sapphire Treasure Gold, ageing it by scraping it away in places. You might just be able to see that I stamped the butterfly with one of the lace stamps too.

The message is from Artistic Outpost and it has a special significance to Matilda. Not only is she a sunny personality, but she just loves to live in the sunshine. I've always imagined that she might one day live in a country a lot warmer than this one, under cloudless blue skies for most of the year! The sentiment was stamped in Wendy Vecchi Red Geranium Archival and the embellishment at the bottom of the heart is a Prima Junkyard Finding accented in Sapphire Treasure Gold.
I should like to link this make to the 'That's Crafty' Challenge this time, which is 'All You Need is Love'. May Matilda know genuine love and friendship wherever she goes and whatever she does. And Thank You for dropping by today. May your week be filled with love, friendship and creativity.
Hello and Welcome to Magpieheaven, Followers and Friends! Over at PaperArtsy, there have been some spectacular autumn creations this month, and last night - September 29th, Leilania shared her Shrink Plastic experiments with a beautiful result. She made a great Halloween pendant. I've loved the possibilities of Shrink Plastic since I discovered it a while back. I decided that I would use it to create a quick gift in the form of a handbag charm. Instead of a Halloween Theme like Leilania, I went for an Autumn one; as this was to be a little October birthday gift for a friend's daughter.
First I painted a sheet of Polyshrink with some water-diluted Fresco. I used Butternut, which is now no longer available, but there are other lovely autumnal shades in Frescos: Autumn Fire springs to mind! I had a little Eiffel Tower charm from a broken pendant and a dog tag, given me by friend, Lucy and some jump rings. These I painted with Guacamole Fresco.
My next step was to die-cut my plastic into leaf shapes, using Tim Holtz's Tattered Leaves die. I then punched a hole at the tip of each leaf with a Cropodile!
Before melting my leaves, I stamped them with these images from Lynne Perrella's PaperArtsy Collection 028 in Jet Black Archival. To both steady the plastic in the blast from the heat tool and to keep that hole open, I anchored my leaves with a pair of craft tweezers.
Treasure Gold in Rose Quartz, Green Amber and Classic gave a nice antique look to the painted dog tag, jump rings and charm.

I also gave the backs a good coating of Treasure Gold. You could glaze your leaves with Glossy Accents or a couple of coats of clear UTEE, but I decided to keep them matte. This was such a quick gift to make, I couldn't believe how soon it was finished! Paris is, I suppose, considered most beautiful in the Springtime; but I love the city in the light of an autumn afternoon. I first visited Paris with a dear friend thirty-five years ago in late September and it was just magical. As we were wandering through the steep cobbled streets of Montmartre the incredible voice of Edith Piaf singing 'La Vie en Rose' rang out from the window of a tall apartment building. My friend and I felt as if we were part of a Francois Truffaut film! I should like to link my handbag chain to PaperArtsy's September Challenge here and thank you for taking the time to drop by Magpieheaven today.
A very photo-heavy blog today and a huge 'Thank you' for the birthday 'Happy Mail' and wishes on Facebook from my crafty friends! I feel like a curator of a very special art gallery with this blog post because the goodies that the Postie brought me today are such masterpieces I really wanted to share them with my followers and friends. I feel privileged to know such talented and generous people.
Even the envelopes were little works of art! These are from Denise Phillips and Hazel Agnew.
Lesley Ebdon decorated not only the gorgeous envelope but also the back of the card!
There was so much to see on Lesley's card. I loved the little wren in the frame...
and all those lovely butterflies!
Denise sent me lapel badges and a fabulous portrait of her dog - the wonderful Oliver Howard of whom I have long been a fan!
She sent me some beautiful altered art bits too.
Look at this incredible card from Lucy Edmondson! Those blooms are made from clay! I love the background on this one too - a really superb use of stencils! If I'm not mistaken, I think you can find out from Lucy's blog True Colours how she made this really original card.
I wish you could see Helen Lindfield's card irl because the textures and colours are so subtle and gorgeous!
Kirsten Alicia's had such a lovely autumn feel and it was another of the wonderful, painty textured variety!
Linda Jones' looked distinctly Fairy Goth Mother to me! I loved her use of feathers, layers and tiny charms.
I loved the colours on Sam's and the use of Stampbord mounted on that lovely black background - wonderful stamping!
A wonderful flowery creation from Hazel. I love her use of book text, the crocheted lace and the depth in that background.
Finally a beautiful, nostalgic card from Lin Shields: just the kind of design I really love! I had to put on my Sherlock Holmes hat for this one because Lin must have been so exhausted when she finished all the work on this lovely card, she forgot to sign her name! I worked out that it was her by the post-code on the back of the envelope! Ha ha!
Well, many, many thanks all of you for such lovely cards and thoughts. I don't think I've ever had such an exciting birthday! I'm off to get ready in a minute for a meal out with my family in our favourite restaurant. Have a lovely weekend everyone!
Hello and welcome to Magpieheaven. Today I'm dreaming with the Dragons again and this time the very talented Helen has chosen our theme. Please do take a look at the amazing collection of tags the Dragon design team, including our lovely GD, Deborah, have created here! I was really excited and eager to play when I saw Helen's challenge this fortnight and her interpretation of it is gorgeous! She would like us to use lace on our tags; the letter 'W' and - of course - at least one stamped image. Here is my take on 'Lace and W'.

I started with a jumbo manila tag, painted with PaperArtsy Fresco in Chalk and a little Haystack. I then swiped three different colours of distress ink over my craft mat: Broken China, Peacock Feathers and Evergreen Bough - and spritzed with water. Normally I would have dragged my tag through the misted colours, but I decided to try a little something new that I had seen somewhere in Blogland. I like to credit my inspiration, but this time I can't remember where I saw this technique, so if it was you, please put up your hand! And forgive me for not acknowledging your technique! I pressed a Prima flourish stencil into the inks and then transferred to my tag. This is the background it gave me.

I loved the marbled effect so whoever you are Thank You, Thank You, Thank You! You can probably see that I distressed the edges using a Prima tool and some Walnut Stain Distress Ink. Now it was time to add more layers - Script from PaperArtsy LPC028 in Wendy Vecchi Cornflower Blue Archival and some gold embossing.
Crafty Individuals have a lovely plate of different lace designs, which is great for backgrounds. I stamped this onto the tag, using Wendy Vecchi's Potting Shed Archival to give a vintage look. As I created the tag, I began to think about my chosen word, 'Wonder', and how childhood is a time of wonder at the smallest everyday things.
I stamped the little girl from Artistic Outpost's Think and Wonder plate onto spritzed and lightly stamped and stencilled card. I had also stamped the back and coloured it for interest when the corners were curled. After painting the tiny Prima wooden scissors I added a miniature pearl as a faux hinge.
I wanted to give the impression of stamped lace becoming real so I added some scraps of lace stiffened with Heavy Gel Medium. Is that a butterfly or a lace bow in the little girl's hair? Tickets to shows, the cinema and the panto were so much a part of childhood wonder and excitement! I die-cut these with a Spell-binder metal die and used Inky Pool and Chalk Frescos with a little Florentine Treasure Gold stencilling over the top. They are fastened with an eyelet and ribbon.

A happy childhood memory for me is being curled up small under my Grandma's chair, listening to the steady clatter of the treadle of her ancient Singer sewing machine. She made bridal dresses and I loved to play with the scraps of lace and silk and tiny covered buttons, and wonder at the intricate metal work on the treadle. Above my head was the dangerous part of the machine, which I must never play with. My mum had hurt her finger on the needle when she was a little girl so BE CAREFUL! Somehow this long ago accident mingled in my imagination with the story of Sleeping Beautiful, a fairy tale that I found both enchanting and very, very scary!

Our thoughts in childhood are so often woven with wonder and - however difficult, however happy - that is what makes a childhood magical. Thank you for dropping by Magpieheaven today. I hope that in the coming days you will find something wondrous in the world around you and that you will want to make a tag including lace and a letter W and link it up HERE.